Livestream: Escape from Hotel Izanami Full Walkthrough Guide.
Follow Full Walkthrough for Ending 5. For other endings, start from Full Walkthrough, then continue to other endings in respective saveslot.
Most of the puzzle is quite ez.
The only puzzle that confuse me is the door puzzle at the underground shrine. Is the stones has some meaning to the puzzle or it is just there to indicate if we go through the right door.
Tips
- You can pass through the mascot with some practice. Stay as close as the mascot as he swing his machete,right after he swing, quickly pass through him before he lift his machete up.
- Learn this technique so that you won’t die when the mascot spawn behind you in a deadend
- Nana can be dead if you take too much time on saving her from crushing on 3F Staff Room(Operation: Rescue Nana from Crushing)
- Azusa can be dead if you take too much time on saving her on 3F elevator(Operation: Rescue Azusa’s Leg)
- Turn on TV has a chance to trigger a CG cutscene and place the mascot beside you after that.
- Only turn TV on if you want the CG. If not, don’t.
Condition for each Endings
Ending 1: Didn’t pick up [Friend’s hat] at the emergency staircase
Ending 2: Get [Piano Wire] from 1F office and did not solve vac tube puzzle in the office
Ending 3: Solve vac tube puzzle in 1F office and did not get [Piano Wire] from 1F office
Ending 4: Didn’t make marking in underground passage below shrine or mark it using crayon
Ending 5: Full Game, did not skip anything
Full Walkthough(Ending 5)
After Mio seperate from the others, walk left to check on the mascot and get [map 1F].
Walk to the center of the floor and proceed to 1F corridor to trigger the cutscene.
To escape from the mascot, run to the right, go to 2F and hide in Room205.
In Room205
- Get [Sewing scissors] in the drawer
- Get [Hanger] in the closet
- Get [Father’s Journal: About my daughter] on the table
- Get [Photo of a parent and child at Fantasy Land] on the floor
- Go washroom, use [Hanger] on the drain
- Use [Sewing scissors] to cut the hair and get [Screwdriver]
- Use [Screwdriver] on the doorlock and exit the room
In 2F Corridor
- Get [map 2F] on the left near room208
- Get [Room 206 Key] in the pile of rubble near Room201
- Trigger cutscene near 2F Staff Room
Goto 2F Staff Room
- Get [Hammer] in the closet
Goto Room204
- Get [Father’s Journal:The doll in a box which my daughter found] on the floor
Goto Room206
- Get [Business Journal: Glow in the dark paint toys] on the table
- Get [Father’s Memoir: Memories with my daughter] in the drawer
- Get [Chisel] in the closet
- Get hint on the wall near doodle
- Check the safe under the TV, use [Chisel] on the wood and enter passcode9356
- Get [Room 202 Key] from the safe
Goto Room202
- Get [Scrapbook: Fantasy Land closing] on the table
- Use [Hammer] on cracked wall and enter room201
In Room201(Operation: Rescue Azusa from the bathroom)
Step to Save Azusa
- Press Button 2(from left)
- Click on the drainage which locate in the water between Azusa’s right hand and breast
- After saving Azusa, get [Glow in the dark spray paint] on floor
Goto Room305
- Get [Business Journal:The shadows in the hotel] on the floor near the bed
- Get [Scrapbook:Tokaezuka construction accident] on the table
- Get [Crayon] in the drawer
Goto Room308
- Get [Video Camera] near curtain
- Get [Candle] in the drawer
- Exit the room
In 3F Corridor
- Get [map 3F] on the left near room308
- Trigger cutscene near 3F Staff Room
3F Staff Room(Operation: Rescue Nana from Crushing)
Step to Save Nana
- Click on the Rack/Shelf near Nana’s Left hand
- Click on the pry bar near Nana’s head
- Click on the Rack/Shelf again
In 3F Corridor
- Get [Business Journal: Outside key for emergency staircase] near 3F Staff Room and elevator
Goto Room303
- Get [Business Journal: Linen room keys] near the bed
Goto 3F Staff Room
- Enter the passcode to open the door.
- Hint: [Business Journal: Linen room keys]
- Answer: 2481
Goto Room303
- Get [Room 302 Key] in the vac tube
Goto Room302
- Get [Business Journal:About the placement of the mascot costume] on the table
Goto Room308
- Get [Crank Handle] and [Tripod] near the curtain
Goto 3F Emergency Staircase(Operation: Rescue Azusa’s Leg)
Step to Save Azusa
- Attach [Crank Handle] onto the crank device on the wal
Goto 3F Staff Room
- Check window to trigger cutscene
Goto Room302
- Get [Lubricating Oil] on the floor near the bathroom
- Get [Sharp Shard of Glass] on the floor near the shelf
- Get [Long Straw] on the shelf
Goto 3F Staff Room
- Use [Spray Oil] on the window
- Use [Sharp Shard of Glass] on the cord
- Goto room303 to save the game for ending 1
SaveSlot 1: Save the game here for Ending 1
Goto Emergency staircase
- Use [Tripod] to get the hat on the outdoor AC unit between 2F and 3F emergency staircase
- walk to the bottom and walk left to get [2nd Floor Emergency Staircase Key] near an AC outdoor unit
- Walk right to get [Friend’s Hat]
- Unlock 2F emergency staircase
Goto 1F Entrance
- Walk to the rightmost and click on the entrance to trigger cutscene
- Walk to the leftmost to enter basement
Basement
- Walk to the rightmost and click on the entrance to trigger cutscene
- Get [Newspaper Article About a Parent-Child Double Suicide] and [Matches] along the basement
Goto 1F Corridor
- Walk to the rightmost and check on 1F Office to trigger cutscene
Goto Room204
- Get [Hotel Office Key] in the bathroom
- Find music box on the right
- Go to Room205 to save the game for ending 2
SaveSlot 2: Save the game here for Ending 2
Goto 1F Office
- Get [Spikey Metal Cylinder] on the desk
- Open the drawer for the hint
- Intereact with vac tube on the left and solve the puzzle(Do not interact with the broken vac tube as that will trigger ending 2 sequence and it’s irreversible)
- Answer: Press according to the sequence: (love,circle,star,+,X) or (302,205,208,301,207)
- Get [Sakaki Branch] from the vac tube
Goto Basement
- Get [Fire Tongs] and [Stepladder] on the right
Goto 1F Office
- Use [Stepladder] to reach the shrine in the middle of the room
- Place [Sakaki Branch] in the vase and get [Cassette Tape]
- Get [Father’s Journal: Music box] on the office desk
Goto Room303
- Insert [Cassette Tape] to the cassette player
- Get [Mainspring]
Goto Room308
- Get [Rubber Tape] near the bed
Goto Room204
- Place [Spikey Metal Cylinder] and [Mainspring] into the music box
- Goto 1F Entrance to save the game for ending 3.
SaveSlot 3: Save the game here for Ending 3
Goto 1F Corridor
- Walk to the middle of the corridor to trigger cutscene
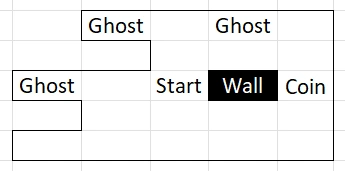
- Walk to the vending machine on the left
- Get [100 yen coin] under the vending machine using [Simple Selfie Stick]
- Maze: Look at Maze section for Map under the vending machine.
- Answer: Up > Right > Right > Down
- Insert the [100 yen coin] into the vending machine to get [Doll’s Head]
Goto Room204
- Get [Small Key] from the mascot
Goto 1F Office
- Get [Scrapbook:Hotel blueprints] and [Scrapbook: Tokaezuka’s Ground-breaking ceremony] from the middle drawer
- Open the lowest drawer, solve the puzzle, insert [Doll’s Head] to get [Doll in box]
- Go to the Shrine(Outdoor) through emergency staircase
Shrine(Outdoor)
- Find phone near the shrine and save the game for ending 4
SaveSlot 4: Save the game here for Ending 4
Shrine(Outdoor)
- Solve the puzzle by matching the woods in the middle of the door
Enter Shrine(Underground)
- Mark the entrance with [Glow in the dark spray paint]
- Proceed to solve the door puzzle by entering them with correct order. Ans: Door 1,3,2
- After that, walk through the Jizo Statues and solve the last puzzle by making them all line upstraight Ans: From left to right, top to bottom, 2-4-6-7-8
- Place [Doll in box] into the shrine and trigger cutscene to Operation: Rescue Mio from Ghost
Shrine(Underground)(Operation: Rescue Mio from Ghost)
- Use [Crayon], [Friend’s Hat], [Video Camera] to distract the ghost
- Proceed to Ending 5 sequence
Ending 1 Walkthrough
Continue SaveSlot 1 from Full Walkthrough
- Goto Emergency Staircase, walk to the bottom and walk left to get [2nd Floor Emergency Staircase Key] near an AC outdoor unit
- Goto 1F Entrance, walk to the entrance to trigger cutscene
- Goto Basement, walk rightmost to trigger cutscene
- Goto 2F Emergency Staircase to trigger ending sequence
Ending 2 Walkthrough
Continue SaveSlot 2 from Full Walkthrough
- Goto 1F Office, click the broken vac tube to get [Piano Wire]
- Go to 1F entrance to trigger ending sequence
Ending 3 Walkthrough
Continue SaveSlot 3 from Full Walkthrough
- Goto 1F entrance to trigger ending sequence
Ending 4 Walkthrough
Continue SaveSlot 4 from Full Walkthrough
Shrine(Outdoor)
- Goto the Shrine(Outdoor) on the right and solve the puzzle by matching them in the middle of the door
- Enter Shrine(Underground), mark the entrance with [Crayon] or do not mark at all
- Proceed to solve the door puzzle by entering them with correct order. Ans: Door 1,3,2
- After that, walk through the Jizo Statues and solve the last puzzle by making them all line upstraight Ans: From left to right, top to bottom, 2-4-6-7-8
- Place [Doll in box] into the shrine and trigger ending sequence
Maze under Vending Machine
The end
Have fun ❤