Here is the quick guide for “Take Me To The Dungeon!!”.
10F – Elite Monster: Ent
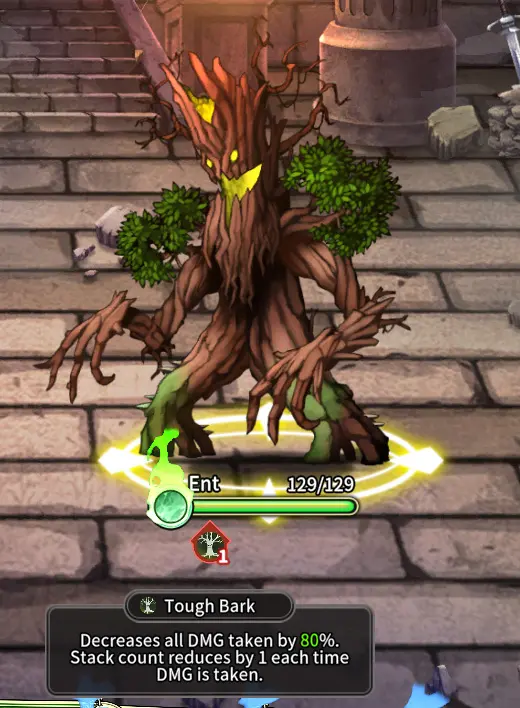
Features
- Tough Bark: Decreases all DMG taken by 80%. Stack count reduces by 1 each time DMG is taken.
Strategy
-
Pick Up Stone: You can gain 2 attack opportunities for only 1 COST. There is even a chance that it won’t be removed from your hand after use. It’s a great weapon against the Ent!
When the Tough Bark buff disappears, the Ent will gain the Weakness Exposed debuff, allowing you to unleash your full offensive power.
Repeat this strategy for 2-3 rounds to defeat the enemy.
20F – Boss: Tentacle Monster
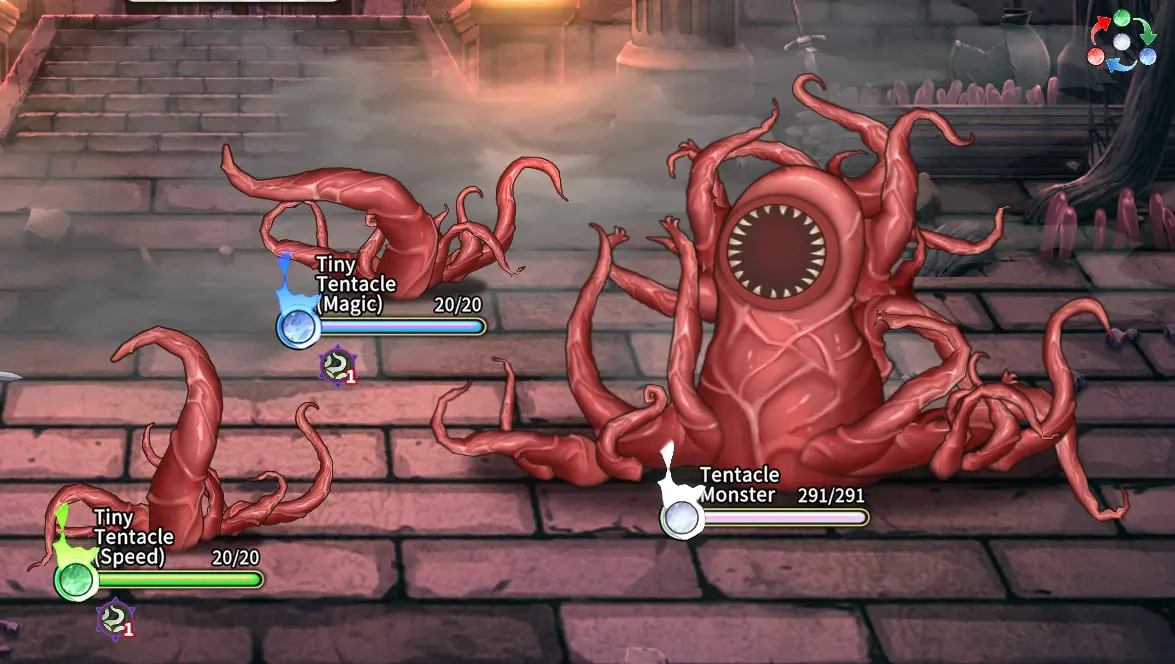
Features
- Multi-target: 1 big tentacle + 2 tiny tentacles. Be mindful of not getting overwhelmed and killed.
- The tiny tentacles will strengthen the big tentacle. However, after killing a tiny tentacle, it will give the big tentacle a debuff that increases damage received from a certain attributes of card.
- The tiny tentacles will keep resurrecting, so don’t invest too many resources in them, or you may run out of cards before defeating the big tentacle.
Strategy
- Prioritize killing the tiny tentacles early on, using as few cards as possible.
※When the number of Burn stacks on the small tentacle exceeds its current HP, it will burn to death in the next turn. At this point, you don’t need to waste cards to kill it. Just turn around and attack the big tentacle. - Attack the large tentacle during the turns when the tiny tentacles haven’t revived yet.
30F – Elite Monster: Mutated Bat
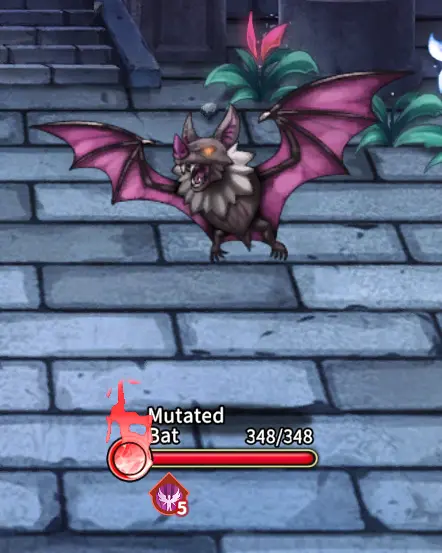
Features
- Enhanced Wings: Increases damage dealt and reduces one layer when hit by a direct attack.
- Attribute Transformation: Changes its own attribute.
Strategy
- Pay attention to attribute changes and try to deal damage as efficiently as possible.
- Use “Disperse” mod to remove negative statuses when needed.
40F – BOSS: Vampire Queen

Features
- Need for Blood: Increases power as HP decreases.
- Summon bat: Only summons one bat. If you’re afraid of dying, you can defeat it first.
- Inflicts Bleed debuff on the player.
- After each life steal, gains Boiling Blood status, absorbing Una’s blood increases
stacks. When it reaches 5 layers, it will unleash a powerful brutal attack. Be cautious of the high damage it deals.
Strategy
- The Vampire Queen will continuously increase the player’s bleeding status, so avoid discarding Card with “Disperse” mod too early. In the presence of bleeding, “Disperse” can restore more HP and remove the bleed debuff, which is very helpful for extended battles.
- The Queen’s brutal attack combined with bleed damage is quite powerful, so pay attention to the stack count of Boiling Blood and Una’s HP. Otherwise, it’s easy to be defeated.
- Treasures with Resurrection can greatly increase your chances of staying alive. If you encounter it, obtain it!
50F – Elite Monster: Minotaur

Features
- It will absorb the damage of the highest damage’s card color, red will charge, green will recover hp, and blue will recover shield.
Strategy
- Pay attention to his attributes when attacking.
60F – BOSS: Pamela

Features
- I’m the Boss: Attribute changes randomly every round. Absorbs DMG of the same attribute.
- Inflict multiple debuffs on Una: Burn, Poison, and Bleed.
- Randomly change our cards attributes (also considered a debuff).
- Replicant: Pamela will clone herself up to three when reaching a certain amount of HP.
- Bomb: Set a bomb that moves towards the enemy after being attacked. Upon contact with either side, it explodes and directly deducts damage equal to the bomb’s health.
Strategy
- The most troublesome thing is that she constantly changes her attributes, hides her own attributes, and regains health when hited by the same attribute. It is crucial to calm down and accurately determine her attributes. Once unable to determine her attributes, it is easy to lose.
There are two methods to determine her attributes:
1. Determine from the card content:
Cards that have attribute advantage will be marked with a special color in the value column. For example, if a Strength (red) card has an advantage over her, it means she has a Speed (green) attribute. At this time, avoid playing cards with Speed (green) attribute.
2. Brief hint:
Every time Pamela changes her attribute, there will be a hint of “Convent to [Attribute]” on her. Just pay attention to the hint.
- Debuff can be removed with card with Disperse mod.
- The debuff that changes card attributes can also be removed with card with Disperse mod.
- When clones appear, pay attention to the status bar. The one with the BUFF is the main body. Being surrounded by clones makes it easy to die, so you need to judge whether to kill the main body first or deal with the clones.
- Bombs can be pushed away with Follow-up Attack and rocks effectively.
- Treasure with Resurrection can significantly improve fault tolerance. Take them whenever you encounter them!
70F – Elite Monster: Flying Lizard

Features
- Give player Bleed
Strategy
- Nothing special, just play as usual.
- If you’re worried, you can bring a card with “Disperse” mod(s).
80F – BOSS: Mona

Features
- Inflict debuffs on Una: Burn, Poison, and Bleed.
- Decreases the base values of all cards.
- At 50% HP, gains a large amount of armor.
- At 50% health, gains 1 stack of “Charge (Evil)” each turn, increasing damage by 25 for each stack.
- When Mona’s armor is broken or “Charge (Evil)” reaches 10 stacks, Mona will immediately attack and flee. As long as Una is alive, it is considered a victory.
Strategy
- Focus on attacking and quickly breaking Mona’s armor.
- Debuffs can be removed with Disperse mod.
- Even if killed by her ultimate move, as long as you have Resurrection Treasures, you can revive and achieve clearance!
SP Elite Monster & BOSS
10F – Elite Monster: Pinky, Bluey, Blackey, Yello

Features
- Group attack: a total of 4 succubi. Yello won’t wake up without being attacked.
- Will flee when HP reaches 50%.
- Their attacks will apply corresponding color mark, which increases the damage Una receive from the enemy, but also increases card values.
Strategy
- Prioritize reducing the number of monsters (kill Pinky or Bluey first, leave Yello for last) to avoid being overwhelmed.
20F – BOSS: Succubus Queen, Pinky, Bluey, Blackey, Yello

Features
- Group attack: a total of 5 succubi. Yello won’t wake up without being attacked.
- Pinky, Bluey, Blackey, Yello start with only 50% HP.
- Their attacks will apply corresponding color mark, which increases the damage Una receive from the enemy, but also increases card values.
Strategy
- Prioritize reducing the number of monsters (kill Pinky or Bluey first, leave Succubus Queen for last) to avoid being overwhelmed.
- Take the splash damage boosting treasure to increase AOE damage.
90F – Elite Monster: Reaper

Features
- Has a lot of HP, but the damage taken increases with each round.
Strategy
- The usual way of doing things will be fine.
100F – BOSS: Mona

Features
- Same as 80F, gains 1 stack of “Charge (Evil)” each round, which increases DMG by 25. Will perform an attack when it reaches 10 stacks or when Mona’s armor is broken.
- Pamela will intervene in the battle, immediately releasing bombs and pushing them towards our side with Mona.
- Mona will not take damage while Pamela is present. When Pamela is defeated, the bomb will disappear.
- After reducing Mona health to 0, depending on the story option, you will achieve victory or start a new round of battle (with restored cards).
- The extra battle in HE does not have any special mechanics to decipher, but Mona is strong and it’s not easy to clear.
Strategy
- Break Mona’s armor as soon as possible.
- Use stones or Follow-up ATK to push the bombs away.
- If possible, try to control the bomb’s health nearly at 999 before hitting it back to Pamela.
- Resurrection Treasure can also help turn the tide of battle. Take them when encountered!
- If you find the extra battle in HE very difficult, you can go back to NE first, defeat NE Mona and obtain the “Ultimate Magic” card, then go and fight HE. It will be a significant power boost.
Congratulations!
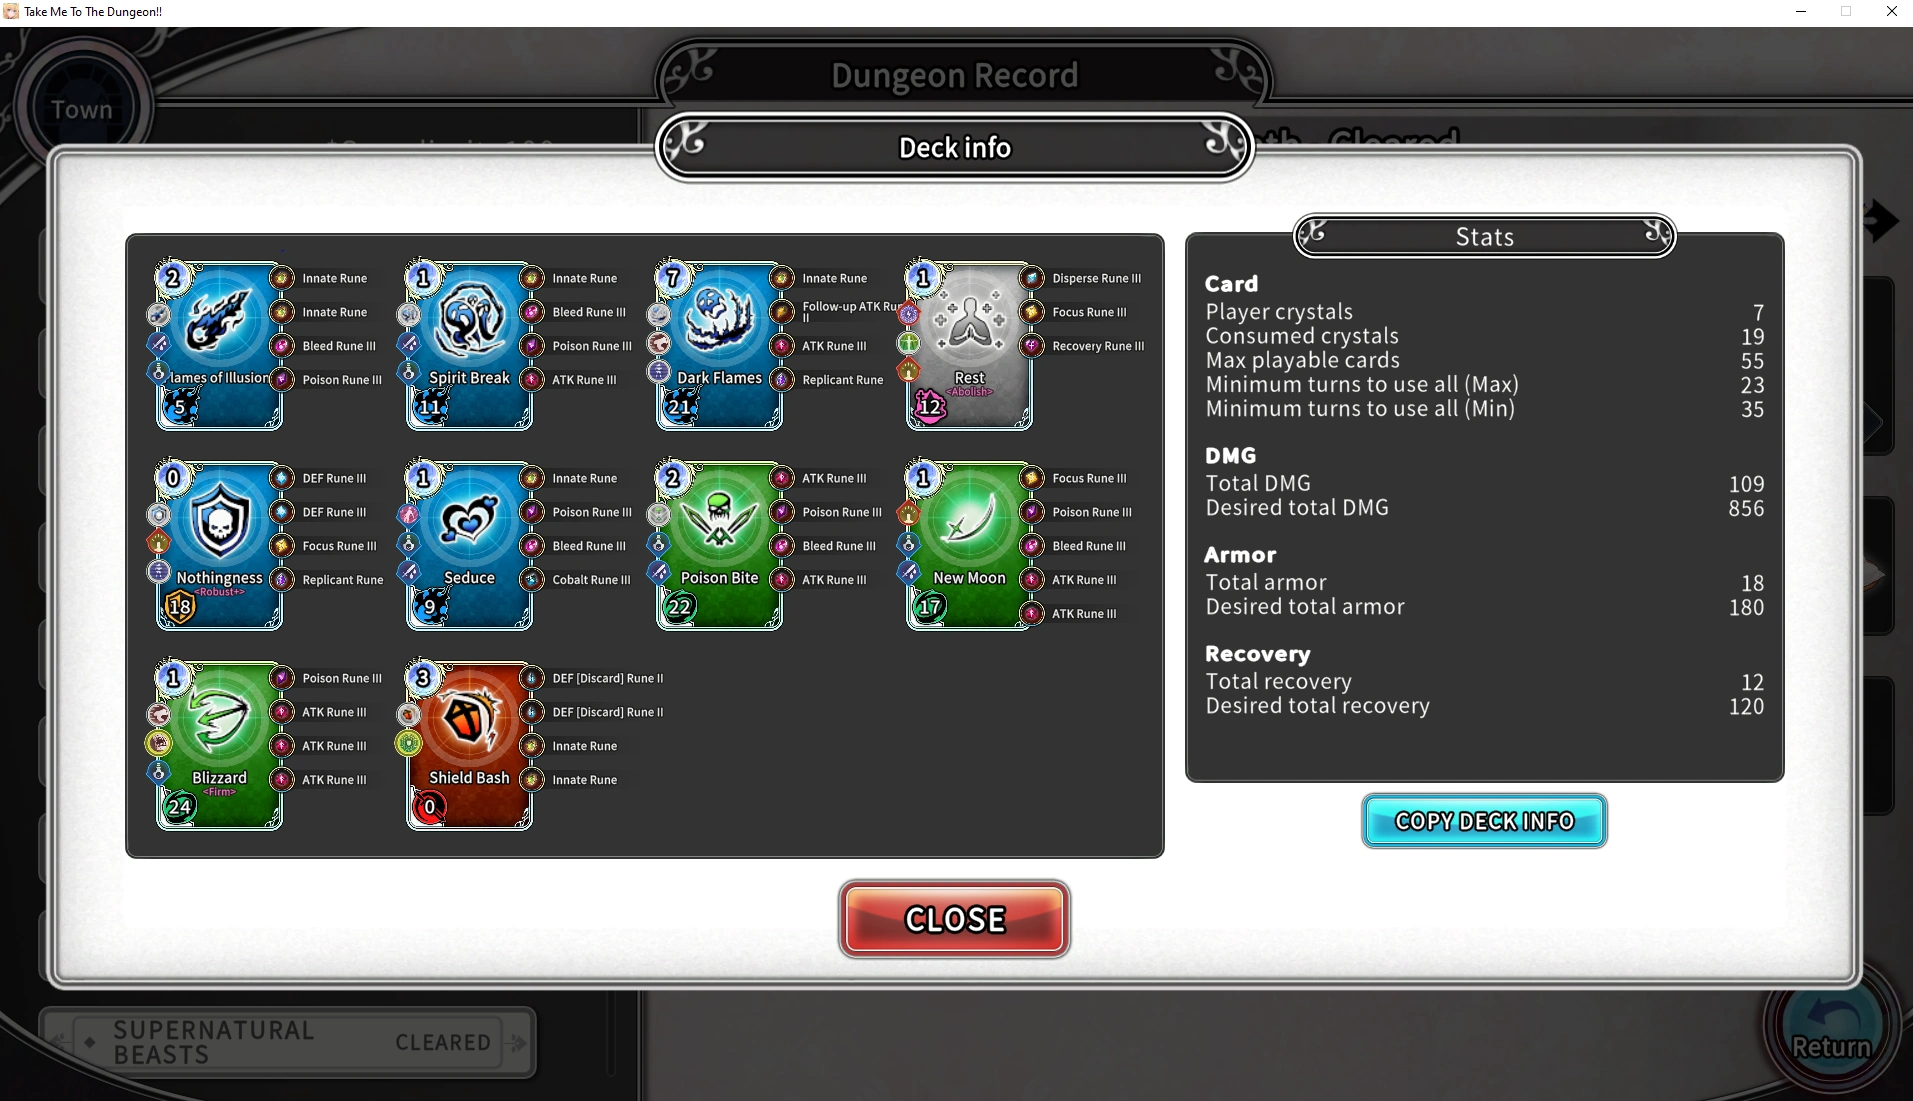
End Game Easy Build
You want to make sure you stack debuffs on the enemy and then use NOTHINGNESS to stack armor. Use SHIELD BASH when you do not care about losing the armor OR use it once stacked to 100-0 bosses.
Have fun ❤