Table of contents and other crap
Stuff I plan on covering… Maybe
- Brief (?) overview of the routes
- Equipment parts
- Jobs
- Skills
- Exploration events
Stuff I don’t want to bother with:
Achievements. They are all locked by route progressions anyway. Nothing tricky here.
Basic rundown
If you’ve played the first game, same stuff. Feel free to skip this bit if you did play the first game.

The place where you change Nova’s parts and equip chips on her. Keep in mind that regardless of what you are putting on her in terms of parts, her Stability will always go down a little. It’s important to change Nova’s parts for her jobs or events. Changing her parts will improve or weaken certain parameters and grant her additional skills associated with specific part.
Details what routes are currently available to you and the requirement needed to advance to the next step. Anytime a route is updated a pink dot will blink over the icon. If you forgot what events are happening when, you can always check back here for a refresher.


It’s your inventory. Shows everything you have as well as important Event Items. Stuff you picked on from the Exploration portion or purchased from the store will be here.
You run of the mill shop easily accessible from your handy dandy phone. Sells perma upgrade chills that will boost Nova’s stats. The Program Cleaning Service does restock in one week unlike the first game. ♥♥♥♥♥♥♥ finally. New costumes might be added to it from events, but that’s it. Chip section sell battle chips. They carry 99 of every battle chip and they restock. Chances are you’ll never buy out this part, considering you are only allowed to make tiresome individual purchases rather than buy in bulk.


Image of the time bar. Each day you have 5-ish turns to do anything: working, researching, playing with Nova… 5-ish because each action can take anything from 1-3 dots to complete. Some piss easy equipment only takes 1 dot to research, and some as much as 3. Work typically consume 2 dots. Events on map range anywhere from 1-3. Typically sexy time at home will only consume 1 dot, much more generous than the first game.
It is important to keep track of time as specific events will only occur at specific times. The checklist icon/Quests section will tell you what days those events will take place.
Research
This part hasn’t changed at all from the first game. It costs money, Notes and time to research parts for Nova. Notes are mainly acquired by progressing through the story from either jobs or events that occur on the map. Clicking on the equipment you need to research will show you its specs, required materials, as well as how much time will be consumed in the form of flashing dots.
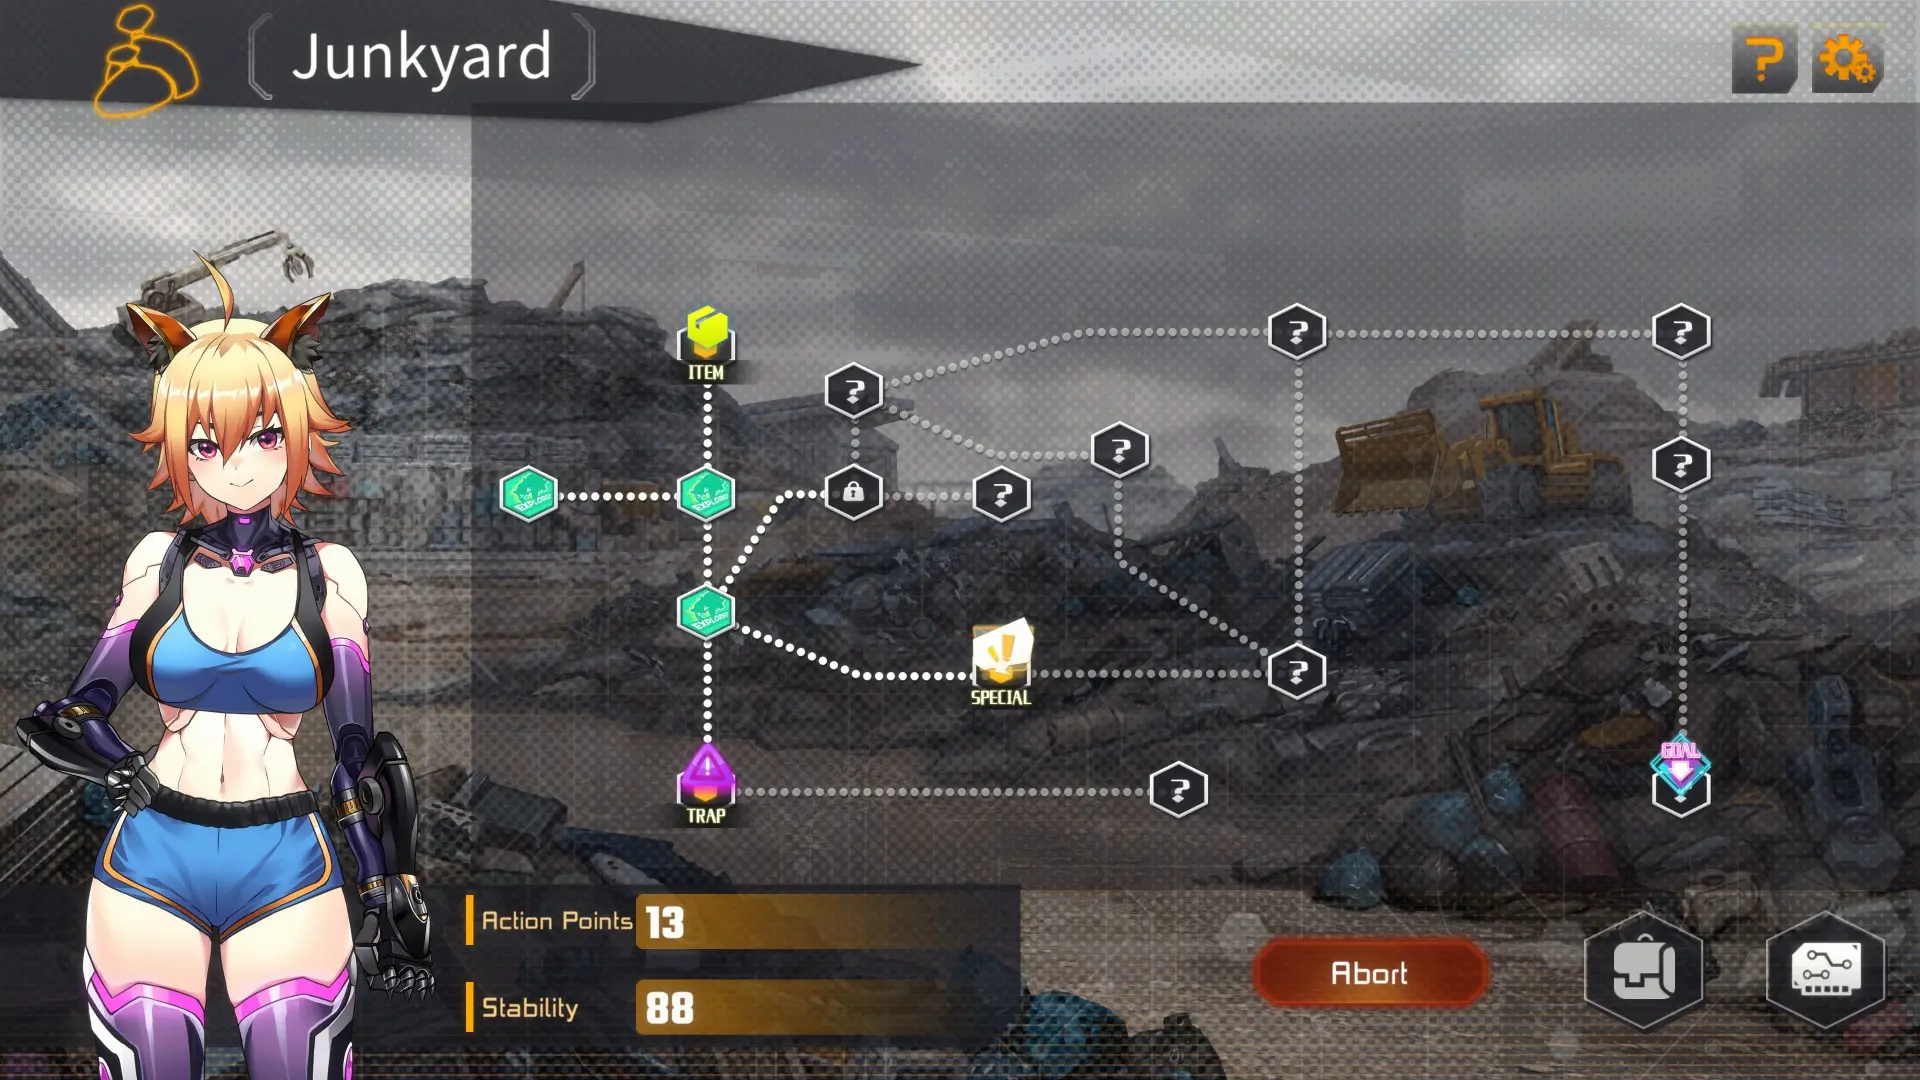
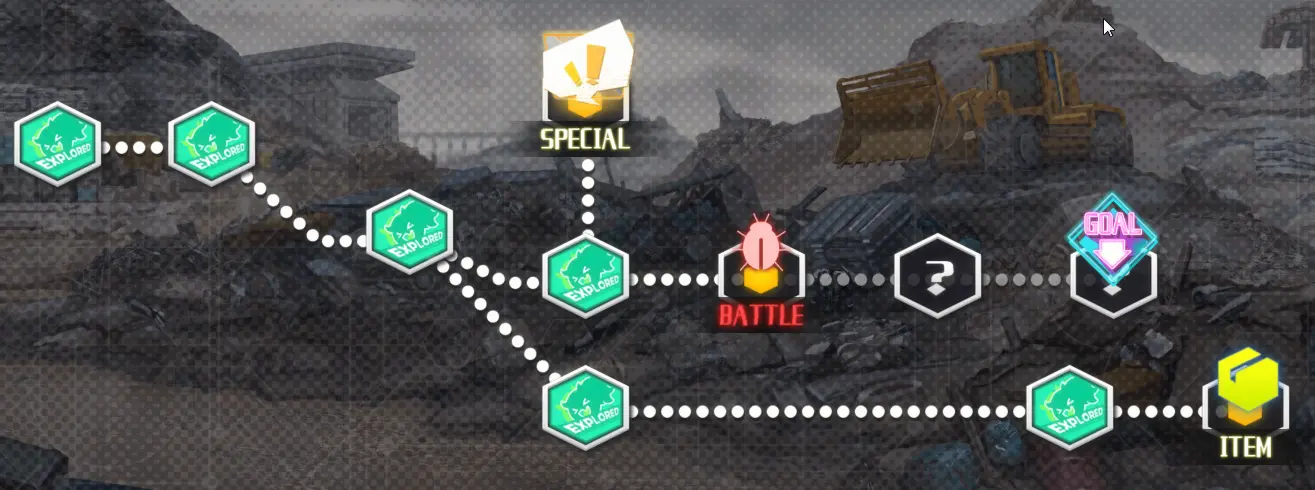
Map
Different from the first game, it’s much more obvious in knowing when there are events occurring on the map. A blinking dot will be over the Map button to indicate new events are happening. Though it’s entirely up to you to be dressed in the appropriate attire for the special events that calls for them, otherwise they won’t show up if you don’t have the right equipment.
Work:

Well… You send Nova to work. Each company will send you down a specific route. You make Nova work to make you money as well as to accrue TP to unlock better paying job. Working is how you advance the main story and unlock new Notes to develop better equipment. You are not locked out of any routes until significant progress has been made for a particular company. The game will warn you first before such a point is reached.
Notice how the green text depict 260% success rate while yellow text has 0. If you have the matching skills for the associated color it will greatly improve Nova’s chance of success when she works. So just meeting the minimum specs aren’t enough. You also want to mix and match the parts for optimal efficiency. Otherwise you’ll be earning peanuts and stuck delivering tofu until the end of the game.
Do note that you can hover over any skill to see which Part you can equip for it.
System Stability
The accursed Stability system is back. Changing Nova’s parts will decrease her Stability, overworking will decrease her Stability, running out of energy while exploring will also do so. The game’s a LOT better about it this time in that there are more opportunities and items that either improve her recovery rate or they buffed the gain from sexy time. The stability restore item Program Cleaning Service when used with Rest will restore 10 Stability and they do restock in the shop in a week. Certain item nodes in exploration would drop items that improve rest rate.
What happens when Stability drops? Nova is a lot more prone to errors and making mistakes on the job. She doesn’t go boom if she reaches 0%. But she can’t explore or work if she’s beat up. Around 85% stability she may get a Trojan Attack debuff, 30% chance that her stability will reduce by 1 point after working with this in effect. Or External Damage which cuts your income gain by 50%. 70-80% stability she may get Error Loop, failure rate +30%. Around mid 60%, she’ll get Low Voltage debuff. She cannot work in this state. There’s no advantage whatsoever in having a low stability Nova. If you like her battered look for whatever reason, there’s a photograph mode you can access from the main menu without going through the hassle of crippling your gameplay.
Sex has benefits
As you unlock more parts, certain costume will offer specific buffs for Nova after sexy time with her in said costume on Sundays. The maid offers Optimizer III buff, which recovers 4 Stability at the end of the day for the next 3 days. May also clear up the debuff once her Stability is high enough again near the 90s range. Kitty part grant you Productivity Boost III buff, obtain $900 bonus pay for each job performed in the next 3 days. Missionary requires you to make the Rebel parts from sub-route Night time Investigations. The buff Experience Boost III allows you to obtain 250 bonus TP for each job for the next 3 days. Daily H just straight up recover 5 Stability with no extra fluff. One thing of note is that unlike the first game, you DO NOT have to change Nova to a specific costume to have sex with her in said costume. Picking the option will automatically give you the scene as long as you already unlocked that option first.
Battle system

Basically pay attention to the color rather than the motif on the icon.

Use green skill to counter this once.
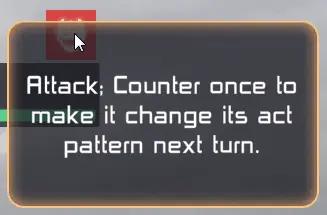
Use red skill to counter this once for the intended effect. There are bosses like this that will even say countering them 1/2 times to create an opening. Eventually this will create an opportunity for you to go ham on the boss. The tricky part with the counter system is sometimes you’ll be asked to counter twice but oh no, skill on cooldown or you don’t have any part with that color. Make good use of your chip slot to make up for that disadvantage. You are not going to use attack chips for major damage, just their color attribute.
Escaping does not penalize you whatsoever. So if you find yourself in a rough spot you can just bail at any time even after the battle has started. There’s an Escape button in the top right corner of the screen. You’ll just lose the Action Point you expended to get to the node. While exploring you are also free to change up your slots however you like. Then there are rare items like Action Recovery that recovers some AP or Durable Repair to recover your HP. These are ONLY usable while on the exploring phase and not battle. They are also on the rare side unless you’ve been diligent with map exploring or have been getting lucky with Alisa’s rewards.
For main route content the enemies are typically whatever until you are running up against the end boss of each route. As the game progress you are sort of encouraged to mix up your parts to have a balanced RGB skill set. Anything your parts lack you should make up for it with attack chips. This game really wants you to use counter system for battles and you’ll be really forced to use them late game and ESPECIALLY epilogue content. Having good stats can help, but not if you can’t burst down the boss in time while you are stuck on cooldown and no way to recover yourself.
Time management
You can fast forward through battles, EE and even research animations if you hold down the Ctrl key
To “kill” time you can use Research to advance time by specific increments of 1-3. Few basic parts only require one, most takes two, with the most advanced part needing 3 to finish researching. There’s no such thing as just “napping” until a certain point to pass the time. This isn’t Fallout or Skyrim. Working will always consume two ticks on the time bar, with it completely unavailable on Sunday. So Sunday could be used to Research or ‘fun’ times. Early on you can research easy parts like Maid or Cat Hat to use up that 1 idle time slot at the end of the day.
Emmie’s sub route events typically happen on Tuesday or Sunday afternoons. Usually not an issue, but if you somehow finish Alisa’s route quickly; sexy time with her Sunday basically bulldoze over the time you could be using to advance Emmie’s route. There’s also a thing with Emmie’s Memory and Animation that involves you finishing (or not) her sub-route before a particular point on Champion’s route.
After 6/14 Stina’s sub-route opens up where staying up late advances her route. You can use this late night to study time consuming parts or do long events. Getting through this route also opens up a sex time buff that can boost your TP gain from working. Very good if you want to rush through the main route quickly.
New game +
On new game +, you start with $500,000 and Immaculate Body/Birthday Torso. your notes and special costumes like Rebel clothes are also carried over. Although the notes and the clothes are there, you can’t research your OP parts right off the bat even with the required materials and the money. Only he beginning parts for Agile, Strengthened and Nun are immediately research-able. Annoyingly, you’ll need to trigger the respective event flag before you can research these parts.
Maid full unlock: finish Emmie route step 3
Cat full unlock: V at Alisa step 4, X at end of step 6
Rebel: V at investigations step 5, X only when the route is completed…
Hacker: V after first ASF, X only if you win last ASF
Streghtened: V after Champion’s 2
Inquisitor: V after Liberation 8
Kung Fu: V immediately available after Champion 5
Ninja: V after Champion 15, X after 16 right before soft Point of No Return
Angel: V immediately after Liberation 13, X after 15 (annoyingly these are right after the stupid afterglow thing)
Succubus: V-I immediately after Liberation 13 after 15 (annoyingly these are right after the stupid afterglow thing)
Routes overview
Destiny route’s the only one that will unlock the Epilogue. Just something to keep in mind when deciding which routes you are picking. The other 2 routes will leave questions unanswered if you do go after those first. Yes, some people care about the plot.
Maid outfit and Cat Costume are automatically available for purchase after the first tutorial day on 6/2. You are also given “Notes on Loyalty” [WORK], “Locomotion Research” [WORK] (shows up as Mobility Research in Event Items), and “Techniques for Balance” [WORK]
On 6/4 Junkyard will be automatically unlocked regardless of your job. Program Cleaning Service chip (to recover Stability when resting) is now for sale in the shop as well.6/14 After midnight you’ll encounter an event which unlocks ASF Championship as well as Late-Night Investigations sub-routes. The investigations sub route is worth doing as quickly as possible for the TP buff you unlock on holiday ‘fun’ times. Emmie and Alisa’s are ok in terms of the associated parts you unlock. Maid X and Cat X parts could tide you over the mid to late part of main routes. Obviously, the route specific series will outperform these down the line in terms of battles. But you can still see me using Kitty or Maid series for jobs even late game for some of the routes. Min-maxer will want to finish Alisa’s thing ASAP since sometimes she does reward you with perma stat buff items.
For the collectors, it’s entirely impossible to collect all the parts in one save the first go due to Liberation route’s decision split mid way. You will be forked into either the Angel or Succubus series. May as well start a new game + if you that sort of thing bugs you.
The game does have a sort of Point of No Return for 2 of the routes. There is none for Liberation route at all, but your buffs from sexy time at home will be overwritten by something useless for other routes. Champion’s route will lock out Emmi’s very very far down the line. While Destiny will lock out EVERYTHING else only around mid point of the route. The game will warn you explicitly for Champion and Destiny routes this way.
Early research priority (excluding route specific gears):
Kitty Arms (for your first EE), Strength Arm, Maid Torso (Emmie’s EE)
Check the route page for recommended parts for each job early on. The later jobs tend to be more flexible, but I do try to include parts that are most accessible.
Sub-routes
6/4 Thursday
Downtown and Junkyard have special events here. Both events cause 3 dots each. Going to Downtown location here will trigger your first meeting with Joy, necessary for Destiny route 2. Junkyard is part of the common route and will ensure you meeting Emmie. Both events are not restricted to specific days so feel free to do these at any time.
The Junkyard portion is the first time you trigger an Exploration Event. Mini Aino will give you a basic rundown.
Emmie: [Catch the Thief], [Maid Training], [Tentacle Maid], [A Warm Hug]
Route exclusive series: Maid V/X series
Finishing the Junkyard event will unlock Emmie’s route. That one’s an EE so refer to that section for more indepth look
1. Neighborhood map event on Tuesday, Saturday & Sunday afternoon or later. Catch the Thief: See Exploration Event’s Junkyard 2 portion. 3 dots
2. Equip the Maid Body and do step 1 again. 2 dots
3. Finish Neighborhood Map Event before Noon. 3 dots > Gives you “A Loyal Heart” note
4. Equip Maid V part and do a home map event > “Cooking Concepts” note
5. Neighborhood Map Event on Tuesday or Sunday afternoon. Requires 800+ Processing and 650+ Durability & Maid [V] parts equipped. > $2000 money, CG 10
6. Neighborhood Map Event on Tuesday or Sunday afternoon. Requires 800+ Processing and 650+ Durability & Maid [V] parts equipped again. > $3000 money
7. Neighborhood Map Event on Tuesday or Sunday afternoon. Requires 800+ Processing and 650+ Durability & Maid [V] parts equipped again. > $3000 money
8. [A Warm Hug] Perform Junkyard map event before noon on weekdays. Unlocks weekend EE for Abandoned Factory at night. Check Exploration Event section for this. You’ll get Legendary Maid notes from completing the map.
9. ??? Probably equip maid part to get pass the notChia gate block.
10. Perform Junkyard map event before noon and do a home map event. > unlock Gallery Memory – 18, Animation – 18
Emmie will be down for some fun on the holiday noon or after. You can get attack or defense chips depending on your selection. Note that sex with Emmie takes 3 slots so you may be skipping sleep for this if you already burnt some time elsewhere. Not the best time spent when you can buy these chips from the market.
Alisa – [Are You Religious], [Kitty in Heat[, [Nun in Distress]
Route exclusive series: Cat V/X
You can get the ball rolling on Sunday, when the Church location is open.
2. Visit the Church on Sunday morning
3. Visit the Church with 350+ Processing on either Thursday or Sunday. 2 dots. Do this twice. > Cat Girl Blueprints note. (may not show up until finishing step 5?)
4. Equip Kitty parts and do the Church Map Event at Thursday or Sunday Night.
5. Home map event at night with Nova wearing Kitty part > Animal Instinct note
6. Complete Downtown EE with Kitty V series parts and 450+ Processing on Thursday or Sunday afternoon. > Catgirl Blueprints II and $2500
7. Complete Abandoned Building map event in the Afternoon or later. There’s a fairly tough boss at the end. Equip best parts for Nova and get the appropriate colored skills. > $5000
On holidays around noon PC can choose to have sex with Alisa by selecting Abandoned Building event. She’ll give you random stat boosting or rest related items as payment.
Late Night Investigations
Route exclusive series: Rebel
This route becomes available automatically at the end of 6/14 after a cut scene. This is the first time you’ll be told about the Android Sports Festival as well.
1. Stay up late working and PC’ll be asked if he wants to go for a walk or stay home. Pick walk and defeat the enemies in 4 turns. You’ll earn $2500 and Nova will recover 2 Stability… Only to lose a lot more in the morning…
2. Same as step one, but the mooks need to be defeated in 3 turns or less. $2500 and Nova recovers 3 Stability.
3. Repeat step 2, 3 turns or less. There is one additional enemy this time. This’ll unlock a new location the Nightclub. Nova recovers 3 Stability, you get Unstable Calculations note, Alternative Clothes and Alternative Hat. Those go towards making Rebel series parts.
*Even after finishing this part of the sub-route, if you work past midnight you can still beat up some mooks for chump change.
4. [Wild Machines] Equip Rebel parts and complete a Nightclub EE on Friday or Sunday midnight. Unlocks Memory and Animation 14
5. Repeat step 4 again, Joy will straight up give you Joy’s Chips and Individualism note first. No EE this time so no need to swap parts. Now you can make better Rebel series parts.
6. Nightclub EE on Friday or Sunday midnight. Finish the map for real this time. Unlocks Rebel Clothes & Rebel Hat for purchase, Memory and Animation 15, 24.
Stina’s now available for sex on the holidays. She’ll boost Nova’s durability points by 20 if you choose to spend time with her. It’ll consume 3 time dots.
Android Sports Festival
Route exclusive series: Hacker
1. Sophie challenges you to a duel at the ASF on 6/21. You can trigger this as a map event before the afternoon. As long as you pass one of the stat check you can advance to the next round, you just won’t get the $4500 from winning. Regardless of your outcome or even participating of ASF, you’ll always unlock CG 12.
1st option:
Fish [Efficiency + Strength combined must be 1000+]
Beef [Durability + Processing combined must be 1000+]
2nd option:
Deep Fry [Requires 2300 + Total TP]
Stew [Requires a 9+ Research Count]
Winning the first round of ASF nets you $4500
2. Starts on 7/12, appears as a Downtown map event before the afternoon. You’ll be put through 3 fights. If you’ve been doing all the other sub-route and their bosses these guys are absolute chumps compared to them. You’ll be rewarded Intro to Virtual Space (Hacker V) note and $6000 for winning. Losing even one fight will disqualify you for the next phase of ASF. Throwing this part won’t help out Sophie if that’s what you were thinking. Unlocks memory and animation 13.
3. 7/26 appears as a Downtown map event before afternoon. Check EE part 2. Getting through the EE nets you Virtual Space: Advanced note, $10000, Unlocks Memory and Animation 26.
A winner is you, congratulations.
Adjusting Performance
Only appears after you’ve done the first part of ASF.
Perform a Home map event during the weekday night. > Unlocks Memory 2 and Animation 2 in the Gallery, and Advanced Processing note for the Hacker series parts
Blueliant Express – Destiny route
Destiny route – needed to unlock Epilogue
Requires Disassemble on Destiny route 10 when infiltrating Church. Proceeding beyond Destiny 10 will lock you out of EVERYTHING else: Be it even Emmie and Alisa’s side routes.
1. Meet someone Downtown and perform Delivery Lv 1 after obtaining 200+ Delivery TP
2. Perform Delivery Lv 1 after obtaining 400+ Delivery TP > Delivery Lv 2, “Techniques for Balance II”
3. Perform Delivery Lv 2 after obtaining 750+ Delivery TP > Delivery Lv 3, “Operating Efficiency” note, EE Delivery Race in the Neighborhood
4. With 400+ Durability complete a Dark Alley EE
5. Perform Delivery Lv 3 after obtaining 1700+ Delivery TP > Investigator Lv 1, “Operating Efficiency II” note, Chip Slot + 1
6. Perform Investigator Lv 1 after completing step 5
7. Perform Investigator Lv 1 after obtaining 1500+ Delivery TP > Investigator Lv 2, “Fluid Dynamics” & “Tinkering with Performance” notes, Infiltrate Kurogane Industries EE
8. Complete EE Kurogane Industries. Unlocks Memory & Animation 3
9. Perform Investigator Lv 2 after obtaining 5000+ Delivery TP > Investigator Lv 3, “Signal Interception” note, Infiltrate the Tangled Church
10. Complete EE at the Church after obtaining 12000+ Investigator TP > $8000, Memory & Animation 23
Proceeding beyond this point will lock down other routes: Champion, Liberation, Alisa and Emmie. If the sub-routes are done it’s whatever, you can still do the horizontal limbo with them.
11. Perform Investigator Lv 3 > Guard Lv 1, “Android Weaponization” note, +1 slot
12. Perform Guard Lv 1 > Battle event Dream
13. Complete Blueliant Logistics EE at night. It’s a linear map so not in the EE section. Just bring 1 of each color with short CD to counter boss. Memory and Animation 4 unlocked after this.
14. Perform Guard Lv 1 after obtaining 7500+ Guard TP > Guard Lv 2, “Location Enemies” note
15. Perform Guard Lv 2 after obtaining 25500+ Delivery TP > Guard Lv 3, “Blueprints to Kurogane Industries” note, Battle event Decisive Battle
16. Perform Guard Lv 3 after completing the Kurogane Industries map event. > “Simulation & Android Weaponization II” note for Guard X
You are given a choice here of either 1 Head to Kurogane or 2 Save Sophie
Option 2: Saving Sophie unlocks Rescue battle event, her fight’s pretty easy. Make sure you have a Recovery Chip equipped on Nova before you initiate the fight.
Option 1: The Kurogane option’s slight difficult but… overall the outcome is same…? IMO, Sophie’s thing feels more important in the long run.
17. Perform a Home map event during the night
18. Complete the Cerulean Logistics map event after obtaining 60000+ Guard TP
The first boss battle is a double trouble, hope you crafted the best parts you can. You want to make use of AOE attack to hit the backline too to counter. Second boss battle is easier, pay attention to the counter and keep your HP up. Final final battle is about the same. Keep one Recovery chip on you and 2 colored chips. You could use the one time use supports as well.
This final step unlocks Memory and Animation 5.
Delivery
Level 1
Recommended specs:
90 Durability
240 Strength
100 Processing
75 Efficiency
Yellow: Agility, Agility II, Basic Appearance, Advanced Appearance, Fluid Design
Green:Calculation, Calculation II, Calculation III
Recommended sets: Agile Head, Agile Torso, Kitty Arms
Level 2
Recommended specs:
140 Durability
460 Strength
160 Processing
100 Efficiency
Yellow: Agility, Agility II, Basic Appearance, Advanced Appearance, Fluid Design
Green:Calculation, Calculation II, Calculation III, Parsing, Parsing II, Parsing III
Recommended sets: Agile Head, Agile Torso, Kitty Arms
Level 3
Recommended specs:
200 Durability
605 Strength
275 Processing
140 Efficiency
Yellow: Agility, Agility II, Advanced Appearance, Fluid Design
Green:Calculation, Calculation II, Calculation III, Parsing, Parsing II, Parsing III
Recommended sets: Agile Head /V, Agile Torso /V, Kitty Arms /V
Investigator
Level 1
Recommended specs:
370 Durability
720 Strength
300 Processing
275 Efficiency
Yellow: Feeling II, [Force Field, Force Field II], Gadgets
Green:Parsing, Parsing II, Parsing III, Perception, Perception II
Recommended sets: Kitty Head /V, Rebel Torso /V, Spy Arms
Level 2
Recommended specs:
400 Durability
900 Strength
520 Processing
490 Efficiency
Yellow: Feeling II, Feeling III, [Force Field, Force Field II], Gadgets, Sneak, Sneak II, Sneak III
Green: Parsing, Parsing II, Parsing III, Core, Core II, Core III, Fluid Design, Negotiate II, Negotiate III, Perception, Perception II, Flight
Recommended sets: Kitty Head X, Rebel Torso /V, Spy Arms
Level 3
Recommended specs:
450 Durability
1200 Strength
600 Processing
575 Efficiency
Yellow: Feeling II, Feeling III, [Force Field, Force Field II], Gadgets, Sneak, Sneak II, Sneak III, Disassemble II, Disassemble III
Green:Parsing, Parsing II, Parsing III, Core, Core II, Core III, Negotiate II, Negotiate III, Perception, Perception II, Flight
Recommended sets: Kitty Head X, Rebel Torso /V, Kitty Arms X
Guard
Lv 1
Recommended specs:
480 Durability
1400 Strength
730 Processing
620 Efficiency
Yellow: Defensive Capabilities, Defensive Capabilities II, Force Field II
Green: Conduction System, Parsing III, Auto-Correct, Focus Weakness, Focus Weakness II
Recommended sets: Hacker Head /V/X, Rebel Torso V/X, Guard Arms
Lv 2
Recommended specs:
700 Durability
1950 Strength
1000 Processing
900 Efficiency
Yellow: Defensive Capabilities II, Sneak, Sneak II, Sneak III, Force Field II, Perception II, Perception III
Green: Super Conduction System, Mobility III, Parsing III, Momentum, Momentum II, Auto-Correct, Core III, Disassemble II, Focus Weakness, Focus Weakness II
Recommended sets: Hacker/Rebel Head /V/X, Kitty/Rebel Torso X, Kitty Arms X
Lv 3
Recommended specs:
1000 Durability
2500 Strength
1200 Processing
1100 Efficiency
Yellow: Defensive Capabilities II, Detect II, Sneak, Sneak II, Sneak III, Force Field II, Perception II, Perception III, Data Protection, Data Tampering II, Parsing III, Calculation IV, Weapon IV
Green: Super Conduction System, Mobility III, Momentum II, Auto-Correct, Core III, Disassemble II, Focus Weakness, Focus Weakness II
Recommended sets: Rebel Head X, Rebel Torso X, Kitty Arms X
Gally Bio – Liberation route
Route exclusive series: Nun, Inquisitor, Purification, Angel/Succubus
1. Perform Acolyte Lv 1 after obtaining 200 TP.
2. Perform Acolyte Lv 1 after obtaining 400 TP. > Unlocks Acolyte Lv 2 and Notes on Loyalty II
3. Perform Acolyte Lv 2 after obtaining 750 TP > Unlocks new event in Downtown, Persuasion note
4. Equip the FULL set of Nun V series and complete a Downtown map event before noon. Takes 3 dots. You’ll earn $2500 and unlock Acolyte Lv 3. Despite what Nova said, you do get to keep the money.
5. Perform Acolyte Lv 3 after obtaining 1700 Acolyte TP > Unlock Inquisitor Lv 1, Clergy License and Chip Slot +1
6. Perform Inquisitor Lv 1 after obtaining 1200 Inquisitor TP.
7. Junkyard EE with 800+ Efficiency and the Negotiate skill. Check Exploration Event part 2 section
8. Perform Inquisitor Lv 1. Gives you Sacred Coils note and Lv 2 Inquisitor.
9. Perform Inquisitor Lv 2 after obtaining 5000 Inquisitor TP. > Tangled Scriptures note
10. Capture 3 fugitive androids on the map. They’ll be showing in Downtown, Neighborhood and Dark Alley afternoon or so. Each capture takes 3 dots so be mindful of your time. The one in the Dark Alley won’t be triggered until you have dealt with the other 2 on the map. For each enemy you are given the option of gaining $4000 at the cost of stability or letting them go. This will affect what notes you’ll get in a future event, you either get notes to develop Angel OR Succubus series.Spare for Angel, turn in for Succubus. Stat and skill-wise, they are completely SAME and only cosmetically different.
11. Complete Neighborhood map event in the afternoon or later with 1000+ Processing.
12. Complete a Home map event. This will replace the holiday Nova sexy time just this one time if you haven’t done this step yet. Unlocks Memory and Animation 8.
13. Perform Inquisitor Lv 3 after obtaining 12000 Inquisitor TP.> Tangled Scriptures [Hidden] note and Club Manager Lv 1
14. Perform Club Manager Lv 1
15. Perform Club Manager Lv 1 after obtaining 7500+ Club Manager TP. > Afterglow Detector, Club Manager Lv 2, Sensual Functions [Pure] or alternative for Succubus series, Memory & Animation 9.
16. Perform Club Manager Lv 2 after obtaining 22500+ Club Manager TP > Club Manager Lv 3, new EE for Private Club, 48 Sex Positions [Pure] & My Scripture (this is missing until…?) notes.
17. Complete Private Club EE. Unlocks Memory & Animation 20.
18. Perform Home map event after obtaining 44500+ Club Manager TP. > Signal Jamming or the alternative note for the Purification X series.
19. Complete Private Club EE. Unlocks Memory and Animation 10, CG 3
After finishing step 15, when working at the club Nova lose controls randomly. The game reminds you to have sex with Nova at specified times and places and gave you a key item Afterglow Detector to monitor her. These sex events show up on the map and depending on when and where, the protection gain varies. These sadly WILL replace the benefits of buffs from home sex. Morning/late night at home gives you 15. Holiday morning or noon/Downtown 40, Each time Nova suffers from an error she loses 15 stability. Save/reload could bypass this since RNG.
Acolyte
Level 1
Recommended specs:
50 Durability
30 Strength
220 Processing
80 Efficiency
Yellow: Indoctrination, Cooking II
Green: Healing, Feeling
Recommended equips: Nun Head, Maid Torso, Maid Arms V
Level 2
Recommended specs:
110 Durability
90 Strength
490 Processing
180 Efficiency
Yellow: Indoctrination, Expression, Cooking, Cooking II, Negotiate
Green: Healing, Feeling, Feeling II, Charisma
Recommended equips: Nun Head, Maid Torso, Maid Arms V
Level 3
Recommended specs:
190 Durability
150 Strength
600 Processing
300 Efficiency
Yellow: Indoctrination, Expression, Expression II, Expression III, Cooking, Cooking II, Negotiate
Green: Healing, Feeling, Feeling II, Charisma
Recommended equips: Rebel Head, Kitty/Maid Torso /V, Maid Arms V
Inquisitor
Lv 1
Recommended specs:
250 Durability
150 Strength
300 Processing
700 Efficiency
Yellow: Healing, Body Purification II, Purifying Flame
Green: Feeling II, Feeling III, Housework, Housework II, Housework III, Cooking II, Cooking III, Negotiate
Recommended equips: Rebel/Inquisitor Head, Maid [V]/Inquisitor Torso, Maid Arms V/X
Lv 2
Recommended specs:
330 Durability
180 Strength
450 Processing
900 Efficiency
Yellow: Healing, Perception II, Perception III, Body Purification II, Purifying Flame, Data Capture
Green: Feeling II, Feeling III, Cooking II, Cooking III, Negotiate, Detect, Detect II, Detect III
Recommended equips: Rebel Head, Maid [V]/Inquisitor Torso, Maid Arms V/X
Lv 3
Recommended specs:
380 Durability
250 Strength
600 Processing
1200 Efficiency
Yellow: Perception II, Perception III, Body Purification II, Purifying Flame, Data Capture, Negotiate II, Negotiate III
Green: Healing, Feeling II, Feeling III, Cooking II, Cooking III, Detect II, Detect III, Data Tempering
Recommended equips: Rebel Head X, Maid [V]/Inquisitor Torso, Maid Arms V/X.
Club Manager
Lv 1
Recommended specs:
380 Durability
400 Strength
1100 Processing
800 Efficiency
Yellow: Healing II, Charisma, Charisma II, Hack II Negotiate II, Negotiate III
Green: Feeling II, Feeling III, Cooking III, Detect II, Detect III, Data Tempering, Data Tampering II, Dance, Detect II, Detect III
Recommended equips: Purification Head/Rebel Head X , Purification Torso, Maid Arms X
Lv 2
Recommended specs:
600 Durability
800 Strength
2000 Processing
1400 Efficiency
Yellow: Healing II, Charisma, Charisma II, Hack II, Negotiate II, Negotiate III, Serve II, Perception II, Perception III
Green: Feeling II, Feeling III, Cooking III, Detect II, Detect III, Data Tempering, Data Tampering II, Dance II, Dance III, Detect II, Detect III, Data Capture
Recommended equips: Purification Head, Purification Torso, Maid Arms X
Lv 3
Recommended specs:
660 Durability
950 Strength
2700 Processing
1600 Efficiency
Yellow: Healing II, Charisma II, Charisma III, Hack II, Hack III, Hack IV, Negotiate II, Negotiate III, Serve II, Perception II, Perception III, Data Tempering III, Calculation IV, Lust-Inducing Signal
Green: Feeling II, Feeling III, Cooking III, Detect II, Detect III, Data Tempering, Data Tampering II, Data Tampering III, Dance II, Dance III, Detect II, Detect III, Data Capture
Recommended equips: Purification Head V/V-I, Purification Torso V/V-I, Maid Arms X
Kurogane Industries – Champion route
Route exclusive series: Strengthened, Kun Fu, Ninja
Kurogane’s all about strength and brute force. You initial research priority should be the Strengthened Series and one random Kitty Head to get started. The Kitty Head will net you great bonus for your TP. And since Kitty Head only costs 1 time dot to research, you can easily fit in wherever without worrying about stability. Do the Junkyard event once it becomes available and keep on working. It’s worth doing Emmie and Alisa’s side routes to research for the Maid and Cat parts as some of these will be decent for Kurogane’s jobs.
1. Complete Common Route – S (Junkyard event) and perform Miner Lv 1 after 200+ Miner TP
2. Perform Miner Lv 1 after 400 Miner TP >Mobility Research II and Miner Lv 2 unlocked
3. Perform Miner Lv 2 after 750 Miner TP > Brawling Capabilities and Miner Lv 3 unlocked
4. Finish a Junkyard event before noon. But it’s just one battle in your room. 3 dots
5. Complete Kurogane Industries Map Event after getting 1700 Miner TP > unlock new job Cyber MMA lv 1, Brawling Capabilities II note, +1 chip slot.
6. Perform “Cyber MMA Lv. 1” > Memory and Animation 16 OR 17 depending on your Emmie route progress
7. Perform Cyber MMA Lv 1 after 1000+ Cyber MMA TP
8. Complete an Arena map event in the afternoon or later. Not a difficult fight. You win $2000 and unlock Cyber MMA Lv 2.
9. Complete an Arena map event in the afternoon after obtaining 5000 Cyber MMA TP. Unlocks Cyber MMA Lv 3
10. Neighborhood map event > MMA Compendium for Kung Fu V
11. Finish home’s combat event in the afternoon or later. Unlocks Memory and Animation 6
12. Complete Arena map event after obtaining 8000 MMA TP. IMO, sub rub bosses are tougher. Unlocks new job Iron Death Ninja Fighterz Lv 1, Parkour Capabilities & Super Dynamics notes, +1 Chip slot
13. Perform IDNF Lv 1
14. Perform IDNF Lv 1 after obtaining 1000 IDNF TP. *Minor challenges now available on Tuesdays & Fridays. Details for them will be posted on Mondays & Thursdays
15. Perform IDNF Lv 1 after obtaining 25500 IDFN TP > new event “Challenge the Runner-Up” , IDNF Lv 2, Brawling Capabilities III, weekly challenges difficulty is increased
16. Complete Arena map event. Check Exploration Event part 2 . IDNF Lv 3 unlocked after this and you win $20000. Ninjitsu Notes appears in your inventory with no fanfare. New event “Preparing for the Championship” is available. The game warns you that triggering this next event will shut down Emmie’s sub-route.
17. Complete Dark Alley battle event after getting 40000 IDNF TP . Unlocks CG 9.
18. This is the final step. Complete the Arena EE after obtaining 44500 IDNF TP. There are 3 battles. First one’s manageable, second one you’ll need to start paying attention to the attacks. Hover over some of the enemy icons and the game will tell you “counter once to create an opening next turn.” So pay close attention to the color attacks you are using. For the final battle, if you check your chips you’ll notice you got new “chips” to use. It’s more or less the same thing but the boss won’t regen health this time around. Unlocks Memory and Animation 7, and CG 4 & 5. Exoskeleton Technology appears in your inventory unceremoniously, allowing you to make the Ninja X parts.
*These are worth doing if you are short on money. If you pass all the stat and skill check you also recover +1 stability per check. Failing the stat check dings you by 2-5 stability. Getting through these with flying colors will net you $10000. Simply scrapping by gets you the pity $2500 and 4000 TP provided Nova’s stability held up at the end. Game force you into these small challenges down anyway so might as well gear up for it the night before. It’s always possible to abort these challenges with no consequences as well. I used default Nova parts + some stat boosting items and she still got the participation prize.
Miner
Level 1
Recommended specs:
265 Durability
190 Strength
45 Processing
100 Efficiency
Yellow: Output, Detect
Green: Protection, Buffer Capacity, Parsing
Recommended part: Strengthened Arm, Kitty Head, Strengthened Torso, Agile Head
Level 2
Recommended specs:
450 Durability
240 Strength
70 Processing
160 Efficiency
Yellow: Output, Mobility, Mobility II, Mobility III, Momentum, Detect
Green: Protection, Buffer Capacity, Parsing
Recommended part: Kitty Head, Strengthened Torso, Strengthened Arms V
Level 3
Recommended specs:
600 Durability
370 Strength
100 Processing
250 Efficiency
Yellow: Output, Output II, Mobility, Mobility II, Mobility III, Momentum, Detect
Green: Protection, Buffer Capacity, Parsing, Protection
Recommended part: Kitty Head, Strengthened Torso, Strengthened Arms V.
Cyber MMA
Level 1
Recommended Specs:
690 Durability
390 Strength
120 Processing
300 Efficiency
Yellow: Output, Output II, Momentum, Momentum II, Momentum III, Parsing, Parsing II, Parsing III, Soothing Hand, Soothing Hand II
Green: Intimidation, Martial Arts, Martial Arts II, Disassemble, Disassemble II, Disassemble III, Simulation, Simulation II, Perception II
Recommended part: Aino Head, Kitty Torso V, Kung Fu Arms (yellow+green bonus), Kitty Arms V/X
Level 2
Recommended Specs:
900 Durability
550 Strength
190 Processing
460 Efficiency
Yellow: Output, Output II, Output III, Momentum, Momentum II, Momentum III, Parsing, Parsing II, Parsing III, Drill Attack II, Drill Attack III, Soothing Hand, Soothing Hand II, Mobility I, Mobility II, Mobility III
Green: Intimidation, Martial Arts, Martial Arts II, Disassemble, Disassemble II, Disassemble III, Simulation, Simulation II, Perception II
Recommended part: Aino Head/Maid Head V/X, Kitty Torso V/X, Kung Fu Arms (yellow+green bonus), Kitty Arms V/X. You can also buy parts from Robomart to up Nova’s specs
Level 3
Recommended Specs:
1200 Durability
725 Strength
300 Processing
650 Efficiency
Yellow: Output II, Output III, Momentum II, Momentum III, Parsing, Parsing II, Parsing III, Drill Attack II, Drill Attack III, Soothing Hand, Soothing Hand II, Mobility II, Mobility III
Green: Intimidation, Martial Arts, Martial Arts II, Disassemble, Disassemble II, Disassemble III, Simulation, Simulation II, Perception II
Recommended part: Aino Head, Kitty Torso V/X, Kung Fu Arms (yellow+green bonus), Kitty Arms V/X. You can also buy parts from Robomart to up Nova’s specs.
Iron Death Ninja Fighterz
Lv. 1
Recommended Specs:
1450 Durability
800 Strength
330 Processing
780 Efficiency
Yellow: Agility III, Momentum II, Momentum III
Green: Disassemble II, Disassemble III, Multi-core, Multi-core II, Core II, Core III, Simulation II
Recommended part: Maid Head X, Hacker Torso, Kitty Arms X.
Lv. 2
Recommended Specs:
2000 Durability
1250 Strength
400 Processing
1100 Efficiency
Yellow: Agility III, Momentum II, Momentum III, Martial Arts II, Martial Arts III
Green: Disassemble II, Disassemble III, Multi-core, Multi-core II, Core II, Core III, Simulation II
Recommended part: Maid Head X, Hacker Torso, Kitty Arms X.
Lv. 3
Recommended Specs:
2750 Durability
1350 Strength
480 Processing
1500 Efficiency
Yellow: Momentum II, Momentum III, Momentum IV, Martial Arts II, Martial Arts III, Mobility IV, Charisma III, Jamming Signal II, Agility III, Agility IV, Signal Jamming III
Green: Disassemble II, Disassemble III, Multi-core, Multi-core II, Core II, Core III, Simulation II, Perception II, Perception III
Recommended part: Ninja Head X, Kitty/Rebel Torso X, Ninja Arms V
Max profit sets [epilogue]: Rebel Head XX, Maid Torso XX/Kung-Fu Torso X, Kitty Arms XX
At this point rather than skill requirements being the issue, it’s the minimum specs most likely. Robomart’s always a thing or you can try to get lucky with Alisa.
Epilogue
Epilogue Mode is an endless mode with exclusive stories and parts. You start with 100,000. You keep all the ♥♥♥♥ you researched (for reals, not just notes) in your save but battles are harder. Main story line events DO NOT trigger while in EM since those got cleared up lore-wise. But you can still work at your old jobs. Your sub-route progress is also reset. According to the blurb, certain incomplete branches will have to be restarted here… Then there’s “You may also choose to return to an older save and complete the branches in the main game.” But you just said sub-route progresses were reset??? Wording’s weird. Basically finish sub-routes on your main game files first if you haven’t?
Aino the Android
1. Complet “A Warm Hug”, “Wild Machines”, “Nun in Distress” and wait until night
2. Complete a Home map event after starting Stina’s, Joy’s or Emmie’s or Alisa’s Epilogue branches
3. Complete any one of Stina’s, Joy’s, Emmie’s or Alisa’s epilogue branches. > Unlocks Research for Prototype XX series with “Unseal Note”, CG 6
4. Complete Home EE. You’ll be fighting the boss from Liberation and Champion route again but this time you’re jacked. Final boss locks your chips for 4 turns. If using my setup, take 2 red chips to counter his red Heals.
My setup: Prototype XX, Rebel Torso XX, Prototype Arms X.
Million Dollar Libido
1. Complete a Church map event before afternoon > Unlock research for Inquisitor Series [X] and Kitty Series [XX]
2. Head to the Church with $1,000,000 in the night. Game hints at making major cash through “a special way” through Alisa. But Alisa will also show up AT YOUR DOORSTEP to solicit money from you to help the poor for a LOT of money as you are saving up over time. She will ask for 20k the first time. 40k (30k according to prompt, so typo?) the second time but you get “Controlling Brain Waves” and “Animal Instinct II” notes for them. 30k again later on… This will go on forever unless you can stop her from robbing you. To do that, you need to make her horny as hell.
In the mornings you can visit the church to make Alisa hot and bothered with your skills from the church to raise her arousal and somehow get money. Sexual Innuendo (Inquisitor Head X) Sensual Pulse (TL for something else?), and Luck Cat Technique (CatTorso/ Arms XX) can help speed up that arousal too. Once Alisa becomes too horny while robbing you, agree to help her out and she won’t take your money.
Once you do have the money, equip yourself with GOOD parts. You’re up for a drawn out fight that’s more tedious and fun. If you lose, they steal 250k of your money. The first 2 mooks aren’t a problem, the healing is annoying but they can be countered. It’s the last one that’s absolute ass. Stupidly high evasion and NONE of my attacks all of a sudden are landing. Great ♥♥♥♥♥♥♥ design… No you can’t just steamroll the enemies over with Prototype XX series. All the Nova attacks hit the back and the other attacks are on long CD. The asinine trick for this battle is when on the second enemy, counter once so the ♥♥♥♥♥♥♥ raises your hit rate. Then you pray to god that you can kill this last ♥♥♥♥♥♥♥ before the buff wears off. For dealing with these sack of ♥♥♥♥, you get one of the token for Sophie’s ♥♥♥♥♥♥♥♥ the Black Tortoise.
My setup: Rebel Head XX, Rebel Torso XX, Kitty Arms X. One of each colored chip.
Raunchy Business
1. Complete a map event Downtown in the afternoon or later
2. Complete a map event in the Dark Alley night or later
3. Complete map event Downtown afternoon or later > “Super-analysis”, “Super Agent” & “Deep Learning” notes for Hacker, Agent and Rebel parts.
4. Complete Nightclub map event night or later > Data: Technique, Data: Personnel, Data: Security
5. Stina’s going to give you a fat word bubble of things to do to run for the massage parlor. The main goal is to accumulated an income of 1 million. (good luck with that when Alisa side route is active)
You can get new personnel from Stina from the Nightclub at night. As your parlor level increase you can order better android personnel to help out at the parlor. You can hire one android from each level. You want to hire the most expensive attendant due to their skills. Attendant Charity Alpha’s Keen Ears can help you boost intel value earning when on Kurogane jobs. Lv 1’s Connor’s Negotiation skills can help reduce troublemakers during parlor phase.
Have Alisa have you with service technique. Sexual Innuendo from the Inquisitor Head X and Lust-Inducing Signal from Inquisitor Torso X will help boost your service experience gain. Do jobs for Kurogane to get intel value to trade in for better parlor security. The Rebellious Faith (Rebel Head XX), Momentum IV (Maid Torso XX), Martial Arts III (Kun-Fu Arms X) skills helps increase the intel value gain. These jobs are you part time jobs from the industries.

Service: Inquisitor X Head/Torso, Kitty Arms XX
Intel: Rebel Head XX, Maid Torso XX/Kung-Fu Torso X, Kung-Fu Arms X.
Getting that 1mil will finish up the twin’s epilogue and unlock Memory & Animation 25, and CG 13.
Used Android Panties
1. Complet Junkyard map event
2. Complete a Downtown map event before Afternoon > True Maid Codex, High-End Maid Uniform.
3. Equip the full “Maid Head XX” & “Maid Torso XX” and complete Downtown map event before afternoon > Unlock EE for Nightclub, Junkyard and Abandoned Factory. Sewing Machine available for purchase. All the maps are recycled from Emmie’s regular sub-routes so I won’t go into details here.
Junkyard boss:
Junkyard EE is almost the exact same rehash as the first ever EE in terms of layout and items, but now you can’t bypass the battle node in the middle. The final twist is that there’s a big ass bot at the goal waiting for you.
Right off the bat your head skills will get skilled for 3 ♥♥♥♥♥♥♥ turns. I tried to deal with the midget troll in the back first but that didn’t work out well. So I ignored it and tried to focus on countering the gorilla at the front and only counter the one in the back if it’s going to seal my head skills again. For wining another garbage fight you get High-Quality Fabric and another ♥♥♥♥♥♥ token Vermilion Bird.
Setup: Hacker Head XX, Rebel Torso XX, Prototype Arms X, one of each colored chips
Nightclub boss:
You can’t counter the emoji face at the front at all, the wolf in the back though is free game. Focus on countering him. You need to blue counter the dumb mutt twice on some of the turns so have more blue skills or blue chips to back you up. Once you managed to correctly counter the wolf, he’ll go crazy and attack his allies. Another ass battle that will give you another stupid token towards Sophie’s ♥♥♥♥: Azure Dragon. Oh, Pheromone Formula for the quest too.
Setup: Prototype Head XX, Guard Body X, Prototype Arms X, 1 Blue Chip II – Range, Green Chip II- Range, Recovery
Abandoned Factory boss:
You are still REQUIRED to equip a Maid part to come in here. notChica will seal your arm skills start of the turn and it’s basically sealed for most of this ♥♥♥♥♥ fight. You need to counter to create an opening. On turn 1 blue counter. Turn 2 red counter. Once you’ve countered twice in a row, boss’s stunned for one turn. Try to survive until you get to counter for another opening again. Getting through this gives you Emmie’s Blueprint, ♥♥♥♥♥♥ token White Tiger. 1 of each colored chip to help counter as usual
Setup: Prototype Head XX, Prototype Body X, Maid Arms X
4. Go to Junkyard event to finish up her route.
Sophie Returns
1. Defeat the four powerful enemies hiding in the city. Defeat the 4 bosses on Emmie and Alisa’s routes for their tokens. Go to sleep.
2. On weekdays go to Dark Alley to beat Sophie
IDNF minor challenges
Pay attention to what the courses say:
Overall stats:
1700 Dura
1300 Strength
1250 Process
1100 Efficiency
Sprint Course – 1100 Efficiency
Tornado Swinging – 1300 Strength & Detect (Kitty Head) / Simulation (Ninja Head)
Spiny Gorge – 1700 Durability & Wild Fists/ Martial Arts (Ninja Arms)
Hydraulic Crawl – 1700 Durability, Agility (Kitty/Inquisitor/Purification Arms) / Lightweight (Kitty Torso)
Laser of Death – 1300 Strength & Simulation (Ninja Head) / Sneak (Kitty/Hacker Arms)
Twin Pillar Trap – 1250 Processing & Detect (Kitty Head) / Simulation (Ninja Head)
World of Pain – 1250 Processing & Movement Prediction (Kung Fu/Ninja Head) / Perception (Kitty/Rebel/Nun/Inquisitor Torso)
Skills: Detect/Simulation, Wild Fists/Martial Arts, Agility/Lightweight, Simulation/Sneak, Detect/Simulation, Movement Prediction/Perception
It’s basically mix and match Ninja or Cat series parts.
Harder challenger only raises the stat requirement
Overall stats:
2200 Dura
1600 Strength
1500 Process
1500 Efficiency
Challenges & Requirements:
Sprint Course – 1500 Efficiency
Tornado Swinging – 1600 Strength & Detect (Kitty Head) / Simulation (Ninja Head)
Spiny Gorge – 2200 Durability & Wild Fists/ Martial Arts (Ninja Arms)
Hydraulic Crawl – 2200 Durability, Agility (Kitty/Inquisitor/Purification Arms) / Lightweight (Kitty Torso)
Laser of Death – 1600 Strength & Simulation (Ninja Head) / Sneak (Kitty/Hacker Arms)
Twin Pillar Trap – 1500 Processing & Detect (Kitty Head) / Simulation (Ninja Head)
World of Pain – 1500 Processing & Movement Prediction (Kung Fu/Ninja Head) / Perception (Kitty/Rebel/Nun/Inquisitor Torso)
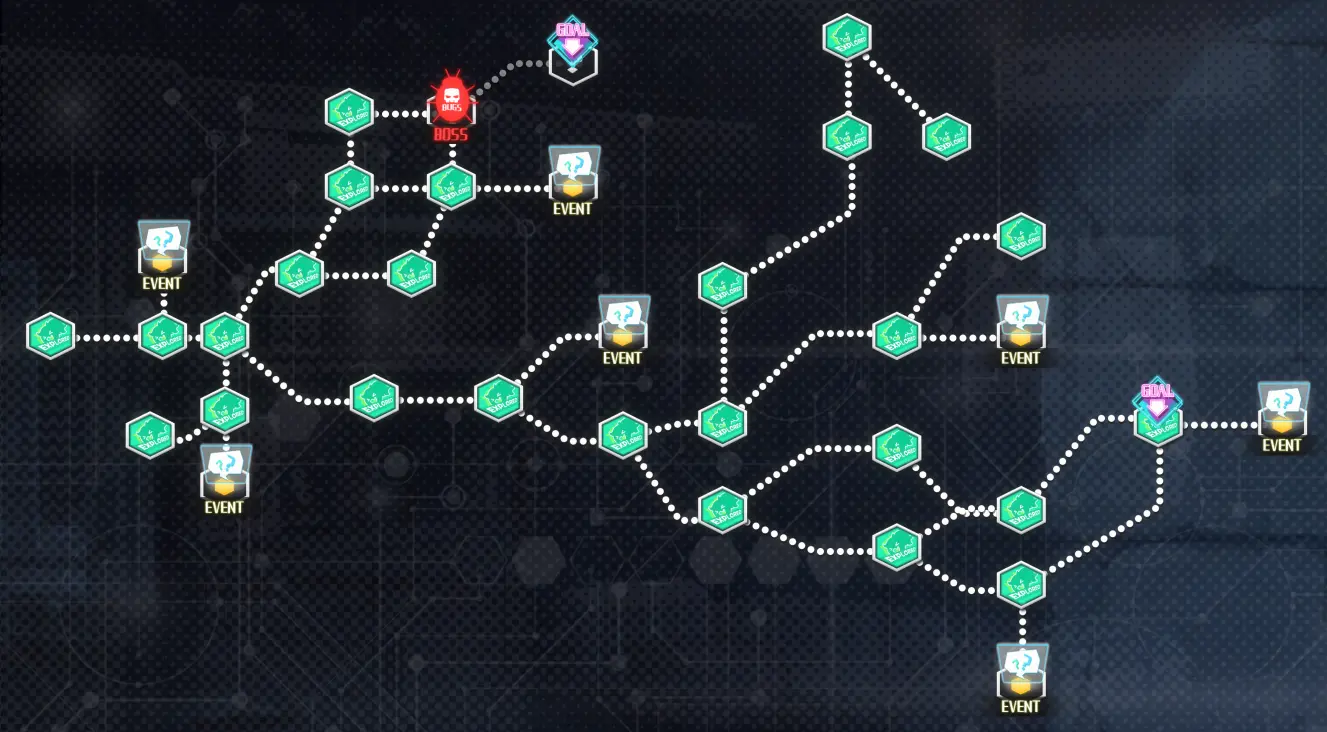
Exploration Events pt 1 Common, Alisa, Emmie, ASF
Junkyard – Common Route
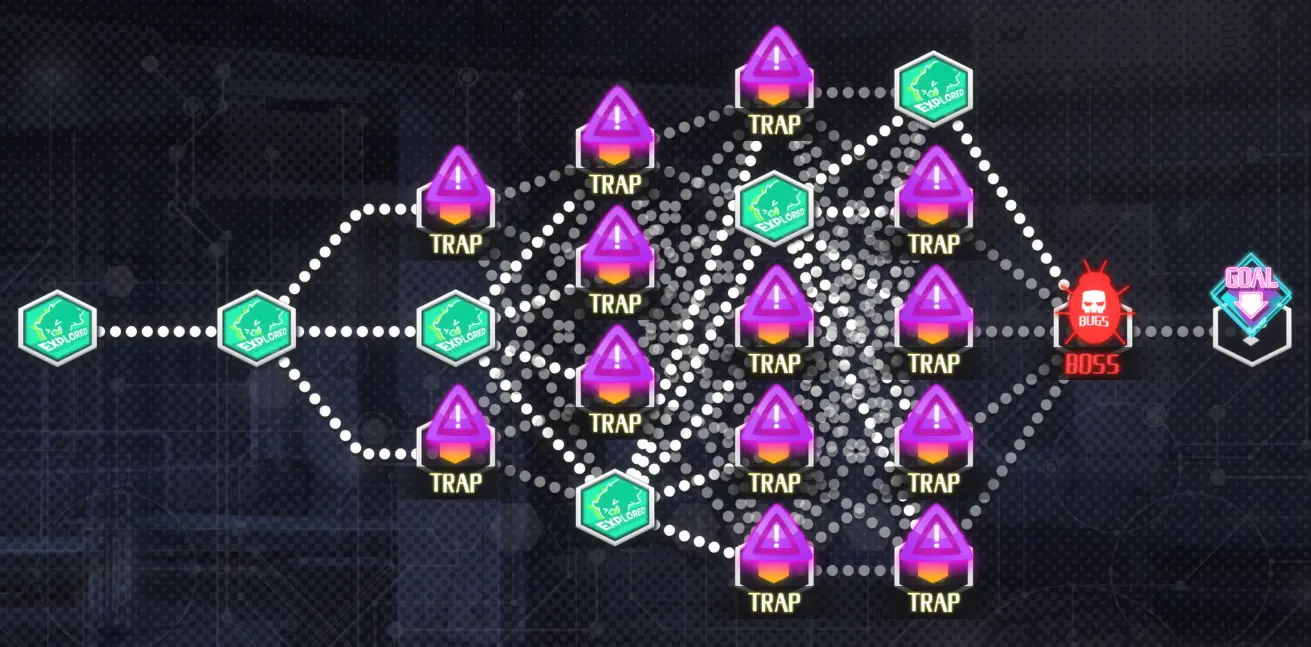
Your intro to Exploration Event. This is a whole new thing different from the first game, essentially a budget dungeon crawling section. You have Action Points/AP to spend on each node. Once Nova’s AP reaches 0 her stability will start going down. The better Nova’s specs are, the higher AP she will start with. For this section, I recommend at the very least, Kitty Arm.
Rewards: Action Recovery & Red Chip (immediately to the north of starting point), Durable Repair & Green Chip (past the south trap node), Red Chip + Enhancement Chip + Defense Chip (the north path skipping the event node), Blue Chip (on the way to goal,) Mysterious Flash Drive
Optional skill: Disassemble
Like an RPG, EE will have Item, Trap, Battle, and Special Event nodes. Be aware that certain nodes will be locked unless you have specific skills. Unless you read ahead there’s no way you know what skills you need really. For the first ever Exploration Event in the Junkyard, you’ll need any one of the Disassemble skill from Kitty Arm to bypass one of the lock node. The locked node will appear as a normal mode if you already have the required part for it. Stepping on trap node will cause you to lose 1 AP here.
It doesn’t matter if you win/lose the first fight. (That’s entirely avoidable if you had the foresight to bring Kitty Arm and take the north path) Emmie will show up regardless. However, losing does put you back at the previous node with no way to get around the mandatory fight. So do gear up properly for your first tutorial ‘dungeon.’ Using Kitty Arm to skip the fight and the game will still treat it as if you fought some sandbags.
Junkyard 2 – Emmi’s route
Item: Red Chip (locked past Drill Attack I), Araki Brand Dog Food (north special node)
Optional skill: Drill Attack I (Strength Arm), Stocking Stomp (Maid Torso) or Stocking Stomp II for the bottom route
I recommend equipping parts with Red, Blue and Green attack skill if you want to try the optional boss here when you come back again.
Available on Neighborhood Tuesday, Thursday or Saturday Afternoon after you finished the previous EE. You won’t be able to clear this the first time because you lack the Notes to develop Maid Torso. (Yes, even on new game + when you already HAVE the damn Maid Torso made beforehand) This first failed excursion does reward you with “Notes on Loyalty” [MAP] to finally make that Maid Torso.
Come back here the second time you’ll notice there’s a 2nd Goal node. This one doesn’t require the special item behind the locked node. But this does mean you’ll need to bulldoze through a bunch of robo chihuahuas. Are you seriously going to beat down some poor robo chihuhuas? It’s also rather meaningless as other than some chump change, you don’t complete the event this way. The item node at the bottom will be replaced with a Boss instead. The boss is actually somewhat tough if you are not properly prepared, the special item you picked up on this map will also have no effect on it. Defeating the boss will net you 5000 as well as some chips: Red Chip – Kai, Blue Chip – Kai, and Defense Chip II. Make good use of Overdrive. The boss’s icon will rotate between Red, Blue and Green attacks. If you are using Maid Torso and Strengthened Arm, you only have the Cat Head part to use a red skill. Save the chip slot for a green attack chip. Counter on all turns until turn 3, when the dog uses green attack. Countering on the green turn once will greatly reduce its defense for 3 turns. Beating the stupid dog nabs you $5000, Red Chip – Kai II, Blue Chip – Kai II and Defense Chip II.
Abandoned Building – Alisa route 7

Well… Traps galore. I tried stepping on a few traps to see if there’s any special events, but everything appears to be the same and I always ended up getting blown back to the start. Equip your best parts, a good balance of skills and at least one recovery HP. The boss here is tanky and can hit hard. Pay special attention to what you need to counter. It’s not an easy fight and I’d do this later on when you have better parts and/or more chip slot. Basic tier V series isn’t enough for this
Abandoned Building – Emmie route 8
MANDATORY: Maid part
Items: Action Recovery III (bottom left), Quality control room ID card. Recovery Chip [1000] (requires Quality control room ID card), Development room ID card (the GOAL node bottom right), Green Chip II (first left node after the Development locked node)
My own equips: Kitty Head X, Maid Torso V, Hacker Arms.
You need to be equipped with a maid part before you can venture deeper into the factory. Feel free to skip all the Event nodes, these are just lore texts and offer nothing useful. The first locked node at the fork requires a Development room ID card. The second locked node to the north of the second fork requires a Quality control room ID card. This key item is right past the at the end of the north path ignoring the locked node.
The enemies here can be annoying. Being terrible with your skill counter could potentially lock up your attacks for the turn. So you really do want to be well prepared or stocked with other colored chips for this map. The boss here is a more beefed up version of the mook here so don’t get careless. When she’s about to attack you with Red Green and Blue icons on the same turn, try to counter as many of her attacks as you can. If her attack lands part of the skills will be sealed, if all of her attack lands she’ll seal all 3 body parts. You’ll be stuck tanking hits for 2 turns straight and possibly losing this fight. It’s annoying that you are forced to have at least 1 maid part for this map. There’s a trap node to the left the area boss, and an optional normal battle you can get around 2 nodes south of the boss. Getting through this annoying map nets you the Legendary Maid notes, and arm part for Emmie.
Downtown – ASF 3
Items: Blue Chip III (north diamond tip), Durable Repair (south diamond tip), Red Chip III (north east), Green Chip III (south east)
There are 2 nodes next to your starting point, nothing you can do here until you’ve beaten the bosses. The bosses have a turn limit of 6 or less. They are not tough, they are just SUPER tanky. All of your damage only deals 1 piddly damage to them. The main idea being you need to have short CD skills to take them down quickly. Contrary to the usual battle tactic, do NOT use the same color attack to counter them. Otherwise they’ll heal themselves. The map also gives you attack items to help you deal with the bosses too, so make good use of them. The final boss is the same as the earlier sandbags, turn limit is 5 now.
My own equip for this is Cat Head X(1 red with 0 CD), Inquisitor Torso V (2 blue), and Hacker Arms (1 green 1 blue).
Exploration Events pt 2 Investigation, Liberation, Champion
Night Club – Night time Investigations

MANDATORY: Rebel part (just one will do)
Item: Psychedelic Chip (middle bottom right path)
There’s nothing you do do yet with the first Event node you encounter so ignore it. There’s a locked node towards the bottom left telling you the door’s locked. You need to pick up the Psychedelic Chip towards the middle bottom right first to get past the event nodes heading to the right of the map. The boss here is impossible to defeat because she’ll always have a one hit kill attack. You are meant to lose the fight here. The Event node in the bottom will only deduct 3 AP points from you at this point. You’ll have to come back to this map later.

MANDATORY: Rebel V part (just one is fine)
Items: Experience Boost II, Durable Repair MAX (where Psychedelic Chip used to be)
Your goal is to go towards the 2 GOAL nodes on the bottom portion of the map to install Joy’s Chips. If you haven’t explored the rest of the map after this, avoid heading to the new GOAL node. Because afterwards the map goes all crazy…
Remember the event node at the middle bottom that only eats your AP? It’s the same thing again, just ignore that. That old door is still locked, and the new part of the map is also locked.
Items: Break room ID card (immediately towards your left), Green Chip – Kai II and Blue Chip – Kai II (bottom left end pf the path), Durable Repair and Defense Chip (top left),
The map is now scrambled. There’s an event node on the bottom right (past the battle node in the sc) that allows you to select where to project distraction to: Women’s bathroom or the stage. Send them to women’s bathroom to unlock the locked node in the bottom left. Either option would remove some of the mooks along the way. Er. Don’t fiddle with the 3D projector after you beat the boss, otherwise you may have to fight her again. Oops…
The boss of the map is right by the goal node at the top. Due to plot her one hit kill attack has been reduced to just strong attack instead. That said, the boss still packs quite a punch. I use Rebel Head V and Kitty X parts with attack chip slots. Not the most fun time, but IMO, easier to deal with than the one from Emmie’s
Junkyard – Liberation route 7

Item: large piece of junk…? (bottom path), Productivity Boost II & Defense Chip (middle of the map), Durable Repair MAX & Blue Chip II (top left)
You need 800+ Efficiency and the skill Negotiate before this can shows up on the map. Available during the holidays afternoon and later. Bottom path has an event where you lose $100 in an event but you need to pick up the large piece of junk is right past this event node first. Otherwise you’ll be forced to backtrack to do this part again. The boss fight here’s not difficult at all.
Private Club – Liberation route 17
Items: 48 Sex Positions (top), Private Club ID card (middle), Sensual Functions (bottom)
Lore-wise supposed to be available on Monday and Thursday according to Nova, but it’s not time restricted. The first trap node takes away 3 AP. Ignore the special event in the south, you still need a key item. This map is trap nodes galore, and they all aim to reduce you AP from a little to A LOT. I have no idea what are the points of those locked nodes. Tried either options on the fugitives or came back on new game+ with all the Purification series research done too. Nodes still locked. I have the notes and all the items from this stage and the nodes remain locked. The only thing you need is the Private Club ID card really. Stepping on all the trap nodes wiped my 58 AP and 97 stability down to 0 and 53 respectively. Pain in the ass… At least no difficult enemies here. The boss you just need to pay attention to her icon. Countering her twice and she can end up healing you when it’s her turn to heal. Countering once could lower the boss’s attributes.
Private Club – Liberation route 19
It’s a straightforward map so I didn’t bother with mapping.
I recommend one red skill with 0 CD for the final boss. 1 CD for other colored chips if possible.
Ignore the event node immediately to the north, it’s nothing. There’s nothing past the locked node either. You are forced to step on 3 trap nodes in a row that sap your AP by a whopping 15 each. The first boss isn’t too difficult. Pay attention to the icons on whether you need to counter her or not. Bring different colored chips to make up for what you lack. Though it’s not obvious, you do get one special chip support if you check your inventory for the second boss. IMO, additional colored chip will work better here. Focus on countering when you can. You’ll have to chip steadily at the boss.
IDNF Arena – Champion’s route 16
Champion route step 16. It’s a EE, woooo…

Item: Action Recovery II
If you’ve been doing the IDNF minor challenges, it’s the same thing but with some battles tacked on. The part you used for regular IDNF work or the challenges would work just fine here for the stat checks. The boss is slightly more difficult if you’ve only been dealing with main route content. Don’t forget to make use of your chip slots. The skill and stat checks are the same as the first weekly challenge requirements. So whatever you use for those are perfect for this EE.
Stat checks:
1700 Dura
1300 Strength
1250 Process
1100 Efficiency
Skill checks: Sneak/Lightweight, Simulation, Wild Fist, Agility, Movement Prediction/Perception, Simulation
1st trap node: 1000 Efficiency check
Row 1
Top (2): 1300 Strength, Simulation
Bottom (1): 1700 Durability, Sneak/Lightweight
Row 2:
Top (3): Battle
Middle (2): 1700 Durability, Wild Fist/Martial Arts
Bottom: (1): 1250 Processing, Sneak/Simulation
Row 3:
3: 1300 Strength, Agility
2: 1250 Processing, Movement Prediction/Perception
1: Battle
Row 4:
4: Action Recovery II item. Unaccessible unless you defeat the enemy on row 1 first, cannot backtrack from row 5
3: 1300 Strength, Simulation
2: Battle
1: 1250 Processing, Simulation
Row 5:
3: 1250 Processing, Movement Prediction/Perception
2: 1700 Durability, Wild Fist/Martial Arts
1: 1300 Strength, Agility
Exploration Events – Destiny route
Neighborhood – Destiny route 4
Items: Green Chip (north of starting point), Optimizer II + Green Chip + Productivity Boost II (the north fork near goal), Strong Bamboo Pole (south)
Spec/skill check: 400 Durability or Drill Attack (north), 600 Strength (south), 600 Strength & 400 Durability OR Lightweight Lv 1 or Mobility Lv 2 (event)
Ignore the locked node south right now, you need to go north first past the stat check on the right fork. There’s a south trap node with another stat check. You need to go there to pick up the key item to get past the Event node. Then it’s another stat check of either 600 Strength & 400 Durability OR Lightweight Lv 1 or Mobility Lv 2.
Kurogane Industries – Destiny route 8

Items: Productivity Boost III & Red Chip – Kai II (south of the first intersection), Productivity Boost (middle), Optimizer & Recovery Chip [1000] (close to boss)
There’s an event node to the east of the south item node, you can use it to disable some fights here. The boss here isn’t threatening at all. Equip some strong parts and go unga bunga on them.
Church – Destiny route 10
Items: Confessional Panties (west end), Optimizer II (along west path), Confessional Photos (right after the battle node in the sc)
Optional skill: Disassembles II
Go north to the event node, after that the 2 locked nodes on either side will be unlocked. Pick up the 2 key items and destroy the mook along the way. When done head back towards the goal.

Items: Flash Grenade key item (above the other item node), Durable Repair + Blue Chip – Kai II + Green Chip – Kai II (bottom left)
The north event node is a dead end, ignore it. The ? node west of the battle node does nothing. Getting the Flash Grenade does get rid of one sandbag for the boss fight so it’s worth picking up.
Head parts – common & sub routes
Aino Head [Prequel Bonus]
300 Durability
300 Strength
300 Processing
300 Efficiency
Skills: Perception II, Kalman Jaming II, Parsing III, Hack II, Feeling III
Already in your inventory if you have the first game’s save.
Birthday Torso
700 Durability
700 Strength
700 Processing
700 Efficiency
Skills: Data Corruption, Iron Mountain, Momentum II, Fluid Design, Data Capture
New game + only. It’ll be in your inventory.
Damaged Head
0 Durability
0 Strength
15 Processing
10 Efficiency
Skills: Short Circuit III
Nova starts with this.
Prototype Head
0 Durability
0 Strength
30 Processing
20 Efficiency
Skill: Short Circuit II
Required materials: Basic Notes (you start with this)
Cost: 50
Research time: 2 dots
Part of tutorial…
Rebel Head
110 Durability
540 Strength
280 Processing
120 Efficiency
Required material: Alternative Hat, Unstable Calculations note
Skills: Jamming Signal, Hack, Feeling II, Negotiate
Cost: 4500
Research time: 1 slot
Night time investigations step 3
Rebel Head V
270 Durability
730 Strength
530 Processing
305 Efficiency
Required material: Alternative Hat, Individualism note
Skills: Jamming Signal, Focus Weakness, Feeling III, Negotiate II
Cost: 6200
Research time: 2 slot
Night time investigations step 4
Rebel Head X
530 Durability
1150 Strength
850 Processing
300 Efficiency
Required material: Individualism note, Rebel Hat
Skills: Jamming Signal II, Focus Weakness II, Feeling III, Negotiate III
Cost: 12000
Research time: 3 slot
Finish the Night time Investigation/Wild Machines sub-route and buy the Rebel Hat from the shop.
Hacker Head
40 Durability
310 Strength
560 Processing
150 Efficiency
Required material: Advanced Processing
Skills: Jamming Signal, Hack, Parsing III, Data Protection
Cost: 3000
Research time: 1 slot
On 6/22 do the Home map event.
Hacker Head V
160 Durability
565 Strength
790 Processing
300 Efficiency
Skills: Jamming Signal, High-speed Processing, Hack II, Parsing III, Data Protection
Required material: Advanced Processing, Virtual Space 101
Cost: 6200
Research time: 2 slot
On 6/22 do the Home map event, win the 2nd ASF on 7/12
Hacker Head X
290 Durability
700 Strength
1250 Processing
465 Efficiency
Skills: Jamming Signal II, High-speed Processing II, Hack III, Parsing III, Data Protection
Required material: Advanced Processing, Virtual Space: Advanced
Cost: 11000
Research time: 3 slot
On 6/22 do the Home map event, win the 3rd ASF on 7/26
Kitty Head
200 Durability
110 Strength
70 Processing
90 Efficiency
Skills: Bite, Parsing, Detect
Required materials: Notes on Wild Beasts
Cost: 1110
Research time: 1 slot
Buy the Cat Outfit to unlock the note for this
Kitty Head V
410 Durability
300 Strength
150 Processing
245 Efficiency
Skills: Feline Ray, Animal Instinct, Parsing II, Detect, Negotiate
Required materials: Notes on Wild Beasts, Catgirl Blueprints
Cost: 3900
Research time: 2 slot
Alisa route step 4 and after, after PC has sex with Nova wearing Kitty part to unlock the blueprints.
Kitty Head X
590 Durability
500 Strength
400 Processing
480 Efficiency
Skills: Feline Ray II, Animal Instinct, Parsing II, Detect II, Negotiate II
Required materials: Animal Instinct, Catgirl Blueprints
Cost: 7000
Research time: 3 slot
Alisa route step 5 and after, after PC has sex with Nova wearing Kitty part to unlock the blueprints.
Maid Head
120 Durability
50 Strength
200 Processing
100 Efficiency
Skills: Jamming Round, Expression, Housework
Required material: Notes on Maids
Cost: 810
Research time: 1 dot
Buy the Maid Costume to unlock the note.
Maid Head V
220 Durability
100 Strength
350 Processing
430 Efficiency
Skills: Jamming Round, X-ray Vision, Simulation, Expression II, Housework II
Required material: Notes on Maids, A Loyal Heart
Cost: 3900
Research time: 2 dot
Emmie route 3
Maid Head X
450 Durability
305 Strength
740 Processing
500 Efficiency
Skills: Jamming Round, X-ray Vision II, Simulation II, Expression III, Housework III
Required material: ????, A Loyal Heart
Cost: 7000
Research time: 3 dot
Nun Head
40 Durability
25 Strength
250 Processing
125 Efficiency
Skills: Holy Word, Feeling
Required materials: Notes on Loyalty [WORK]
Cost: 750
Research time: 2 dots
Immediately available for research after the first day of tutorial
Agile Head
80 Durability
190 Strength
130 Processing
110 Efficiency
Skills: Observed, Calculation, Parsing
Required materials: Techniques for Balance
Cost: 800
Research time: 2 dots
Immediately available for research after the first day of tutorial
Head parts – main routes
Agile Head V
95 Durability
280 Strength
185 Processing
130 Efficiency
Skills: Observed, High-speed Processing, Calculation, Parsing
Required materials: Techniques for Balance II
Cost: 1100
Research time: 2 dots
Complete Destiny route step 2
Agent Series – Spy Head
50 Durability
300 Strength
350 Processing
160 Efficiency
Skills: X-ray Vision, High-speed Processing, Calculation II, Parsing
Required materials: Operating Efficiency II
Cost: 3500
Research time: 2 dots
Destiny route 4
Agent Series – Spy Head V
150 Durability
400 Strength
470 Processing
230 Efficiency
Skills: X-ray Vision, Death Ray, Calculation II, Parsing II
Required materials: Fluid Dynamics, Signal Interception
Cost: 6000
Research time: 3 dots
Destiny route 7, 9
Guard Head
250 Durability
635 Strength
800 Processing
495 Efficiency
Skills: Optical Analysis, Death Ray, Calculation III, Parsing III
Required materials: Android Weaponization, Signal Interception
Cost: 10100
Research time: 3 dots
Destiny route 9, 11
Guard Head V
380 Durability
810 Strength
1020 Processing
610 Efficiency
Skills: Optical Analysis II, Death Ray II, Calculation III, Auto-Correct
Required materials: Android Weaponization, Locating Enemies
Cost: 12000
Research time: 3 dots
Destiny route 11, 14
Guard Head V
510 Durability
890 Strength
1340 Processing
725 Efficiency
Skills: Thermal Analysis II, Death Ray II, Calculation III, Auto-Correct
Required materials: Android Weaopnization II, Simulation
Cost: 15000
Research time: 3 dots
Destiny route 16
Nun Head V
90 Durability
50 Strength
300 Processing
190 Efficiency
Skills: Holy Word, Feeling, Negotiate
Required materials: Notes on LoyaltyII [WORK]
Cost: 1000
Research time: 2 dots
Finish Liberation route 2
Inquisitor Head
100 Durability
90 Strength
320 Processing
310 Efficiency
Skills: Holy Word II, Feeling II, Negotiate
Required materials: Notes on LoyaltyII [WORK], Clergy License
Cost: 3400
Research time: 2 dots
Finish Liberation route 5
Inquisitor Head V
170 Durability
140 Strength
340 Processing
480 Efficiency
Skills: Holy Word II, High-Frequency Sound Waves I, Feeling II, Negotiate II
Required materials: Notes on LoyaltyII [WORK], Sacred Coils
Cost: 6000
Research time: 3 dots
Finish Liberation route 5, 8
Succubus Series – Purification Head
269 Durability
169 Strength
690 Processing
469 Efficiency
Skills: Data Erasure [Mouth], High-Frequency Sound Waves 1, Feeling II, Negotiate II
Required materials: Tangled Scriptures [Hidden]
Cost: 9500
Research time: 3 dots
Finish Liberation route 13
Succubus Series – Purification Head V
269 Durability
196 Strength
1269 Processing
690 Efficiency
Skills: Data Erasure [Mouth], High-Frequency Sound Waves 2, Feeling III, Negotiate III
Required materials: Tangled Scriptures [Hidden], Sensual Functions
Cost: 11000
Research time: 3 dots
Finish Liberation route 13, 15
During the 3 fugitives scenario, choose to turn them in
Succubus Series – Purification Head X
369 Durability
269 Strength
1869 Processing
869 Efficiency
Skills: Data Erasure [Mouth], High-Frequency Sound Waves 3, Feeling III, Negotiate III, Purifying Flame
Required materials: Signal Jamming, Sensual Functions
Cost: 14000
Research time: 3 dots
Finish Liberation route 15, 18
During the 3 fugitives scenario, choose to turn them in
Angel Series – Purification Head V-I
269 Durability
196 Strength
1269 Processing
690 Efficiency
Skills: Data Erasure [Eye], High-Frequency Sound Waves 2, Feeling III, Negotiate III
Required materials: Tangled Scriptures [Hidden], Sensual Functions [Pure]
Cost: 11000
Research time: 3 dots
Finish Liberation route 13, 15
During the 3 fugitives scenario, spare them
Angel Series – Purification Head X-I
369 Durability
269 Strength
1869 Processing
869 Efficiency
Skills: Data Erasure [Eye], High-Frequency Sound Waves 3, Feeling III, Negotiate III, Purifying Flame
Required materials: Signal Jamming, Sensual Functions [Pure]
Cost: 14000
Research time: 3 dots
Finish Liberation route 15, 18
During the 3 fugitives scenario, spare them
Kung-Fu Head
300 Durability
150 Strength
100 Processing
260 Efficiency
Skills: Headbutt, Detect, Intimidation
Required materials: Brawling Capabilities II
Cost:3100
Research time: 2 dots
Finish Champion’s Route 5 for the note
Kung-Fu Head V
450 Durability
185 Strength
125 Processing
410 Efficiency
Skills: Headbutt II, Movement Prediction, Detect II, Intimidation
Required materials: Brawling Capabilities II, MMA Compendium
Cost:5600
Research time: 3 dots
Finish Champion’s Route 5, 9
Ninja Head
590 Durability
330 Strength
500 Processing
780 Efficiency
Skills: Headbutt II, Movement Prediction, Detect III, Simulation
Required materials: Super-Dynamics, Parkour Capabilities
Cost:9400
Research time: 3 dots
Champion’s route step 12
Ninja Head V
700 Durability
400 Strength
280 Processing
1100 Efficiency
Skills: Headbutt II, Signal Jamming, Detect III, Simulation II
Required materials: Super-Dynamics, Brawling Capabilities III
Cost: 11500
Research time: 3 dots
Champion’s route step 12, 15
Ninja Head X
860 Durability
520 Strength
320 Processing
1470 Efficiency
Skills: Headcrusher, Signal Jamming II, Detect III, Simulation II
Required materials: Super-Dynamics, Ninjutsu Notes
Cost: 11500
Research time: 3 dots
Champion’s route step 12, 16
Torso parts – common & sub routes
Prototype Body
65 Durability
15 Strength
0 Processing
15 Efficiency
Skills: Tackle
Default body
Prototype Body V
120 Durability
40 Strength
30 Processing
40 Efficiency
Skills: Tackle, Luck
Required materials: Basic Notes
Costs: 200
Research time: 2 dots
Immediately available for research after the first day of tutorial
Rebel Torso
125 Durability
525 Strength
125 Processing
325 Efficiency
Skills: Force Field, Perception, Filter Test, Mobility Test
Required material: Alternative Hat, Unstable Calculations note
Cost: 4800
Research time: 2 slot
Night time investigations step 3
Rebel Torso V
330 Durability
750 Strength
260 Processing
575 Efficiency
Skills: Force Field II, Perception II, Filter, Mobility II
Required material: Alternative Clothes, Individualism note
Cost: 6500
Research time: 2 slot
Night time investigations step 4
Rebel Torso X
490 Durability
1120 Strength
370 Processing
720 Efficiency
Skills: Force Field II, Perception III, Filter, Mobility III
Required material: Individualism note, Rebel Clothes
Cost: 13000
Research time: 3 slot
Finish the Night time Investigation/Wild Machines sub-route and buy the Rebel Hat from the shop
Hacker Torso
45 Durability
280 Strength
500 Processing
270 Efficiency
Skills: High-speed Camouflage, EMP, Core II, Energy
Required materials: Advanced Processing
Costs: 3300
Research time: 2 dots
On 6/22 do the Home map event
Hacker Torso V
200 Durability
525 Strength
720 Processing
480 Efficiency
Skills: High-speed Camouflage, EMP II, Core III, Energy II
Required materials: Advanced Processing, Virtual Space 101
Costs: 6500
Research time: 2 dots
On 6/22 do the Home map event, win the 2nd ASF on 7/12
Hacker Torso X
380 Durability
660 Strength
1100 Processing
640 Efficiency
Skills: High-speed Camouflage II, EMP III, Core III, Energy II
Required materials: Advanced Processing, Virtual Space: Advanced
Costs: 12000
Research time: 3 dots
On 6/22 do the Home map event, win the 3rd ASF on 7/26
Kitty Torso
250 Durability
145 Strength
35 Processing
145 Efficiency
Skills: Lightweight, Mobility, Charisma
Required materials: Notes on Wild Beasts
Costs: 1150
Research time: 2 dots
Buy the Cat Outfit to unlock the notes
Kitty Torso V
400 Durability
300 Strength
120 Processing
270 Efficiency
Skills: Lightweight, Perception II, Mobility II, Charisma
Required materials: Notes on Wild Beasts, Catgirl Blueprints
Cost: 4000
Research time: 2 slot
Alisa route step 4 and after, after PC has sex with Nova wearing Kitty part to unlock the blueprints
Kitty Torso X
725 Durability
480 Strength
330 Processing
480 Efficiency
Skills: Lightweight II, Perception III, Mobility III, Charisma II
Required materials: Animal Instinct, Catgirl Blueprints
Cost: 8000
Research time: 3 slot
Alisa route step 5 and after, after PC has sex with Nova wearing Kitty part to unlock the blueprints
Maid Torso
160 Durability
65 Strength
170 Processing
17 Efficiency
Skills: Stocking Stomp, Healing
Required materials: Notes on Maids, Notes on Loyalty [MAP]
Costs: 1150
Research time: 2 dots
Buy the Maid Costume to unlock the first note, then do the first part Emmie route Catch the Thief for the second note
Maid Torso V
200 Durability
100 Strength
375 Processing
430 Efficiency
Skills: Stocking Stomp, Heart of a Maid, Healing, Momentum
Required materials: Notes on Maids, A Loyal Heart
Costs: 4000
Research time: 2 dots
Emmie route step 3
Maid Torso X
580 Durability
360 Strength
660 Processing
450 Efficiency
Skills: Stocking Stomp II, Heart of a Maid II, Healing II, Momentum II, Flight
Required materials: ????, A Loyal Heart
Costs: 8000
Research time: 3 dots
Agile Torso
160 Durability
260 Strength
90 Processing
50 Efficiency
Skills: Flying Kick I, Mobility, Basic Appearance
Required materials: Techniques for Balance
Costs: 1000
Research time: 2 dots
Immediately available for research after the first day of tutorial
Nun Torso
110 Durability
60 Strength
160 Processing
100 Efficiency
Skills: Perception, Indoctrination
Required materials: Notes on Loyalty [WORK]
Cost: 950
Research time: 2 dots
Immediately available for research after the first day of tutorial
Strengthened Torso
260 Durability
135 Strength
25 Processing
110 Efficiency
Skills: Full Tackle, Protection, Mobility
Required materials: Mobility Research
Cost: 900
Research time: 2 dots
Immediately available for research after the first day of tutorial
Torso parts – main routes
Agile Torso V
220 Durability
300 Strength
100 Processing
90 Efficiency
Skills: Flying Kick, Mobility II, Advanced Appearance
Required materials: Techniques for Balance II, Operating Efficiency
Cost: 1450
Research time: 2 dots
Liberation route 2, 3
Agent Series – Spy Torso
255 Durability
375 Strength
140 Processing
110 Efficiency
Skills: Shadow Kick, Data Corruption, Mobility II, Fluid Design
Required materials: Operating Efficiency II
Cost: 3900
Research time: 2 dots
Destiny route 4
Agent Series – Spy Torso V
340 Durability
510 Strength
250 Processing
125 Efficiency
Skills: Shadow Kick, Data Corruption, Mobility II, Flight
Required materials: Fluid Dynamics, Operating Efficiency
Cost: 6100
Research time: 3 dots
Destiny route 5, 7
Guard Torso
480 Durability
750 Strength
290 Processing
230 Efficiency
Skills: Knight Kick, Data Corruption II, Defensive Capabilities, Core
Required materials: Android Weaopnization, Operating Efficiency II
Cost: 10500
Research time: 3 dots
Destiny route 5, 11
Guard Torso V
690 Durability
1175 Strength
425 Processing
360 Efficiency
Skills: Knight Kick II, Data Corruption II, Defensive Capabilities, Core II
Required materials: Android Weaopnization, Blueprints to Kurogane Industries
Cost: 15000
Research time: 3 dots
Destiny route 11, 15
Guard Torso X
950 Durability
1750 Strength
610 Processing
540 Efficiency
Skills: Knight Kick III, Data Corruption II, Defensive Capabilities II, Core II, Battlefield Scan
Required materials: Android Weaopnization II, Blueprints to Kurogane Industries
Cost: 16600
Research time: 3 dots
Destiny route 15, 16
Nun Torso V
160 Durability
100 Strength
240 Processing
180 Efficiency
Skills: Perception II, Body Purification, Indoctrination
Required materials: Notes on Loyalty II [WORK], Persuasion
Cost: 1300
Research time: 2 dots
Finish Liberation route 2 and 3
Inquisitor Torso
140 Durability
155 Strength
280 Processing
300 Efficiency
Skills: Perception II, Body Purification, Healing
Required materials: Notes on Loyalty II [WORK], Clergy License
Cost: 3500
Research time: 2 dots
Finish Liberation route 5
Inquisitor Torso V
165 Durability
245 Strength
360 Processing
430 Efficiency
Skills: Perception III, Roundhouse Kick, Body Purification II, Healing
Required materials: Tangled Scriptures, Sacred Coils
Cost: 6100
Research time: 3 dots
Finish Liberation route 8, 9
Succubus Series – Purification Torso
269 Durability
269 Strength
469 Processing
690 Efficiency
Skills: Purify, Roundhouse Kick, Charisma, Sensitivity Field, Dance
Required materials: Tangled Scriptures [Hidden]
Cost: 10000
Research time: 3 dots
Finish Liberation route 13
Succubus Series – Purification Torso V
369 Durability
469 Strength
696 Processing
969 Efficiency
Skills: Purify, Roundhouse Kick II, Charisma II, Sensitivity Field, Dance II
Required materials: Tangled Scriptures [Hidden], 48 Sex Positions
Cost: 13000
Research time: 3 dots
Finish Liberation route 13, 16
During the 3 fugitives scenario, choose to turn the 2 in
Succubus Series – Purification Torso X
469 Durability
669 Strength
1069 Processing
1169 Efficiency
Skills: Sensual Pulse II, Roundhouse Kick III, Charisma III, Sensitivity Field II, Dance III
Required materials: Signal Jamming, 48 Sex Positions
Cost: 15000
Research time: 3 dots
Finish Liberation route 16, 18
During the 3 fugitives scenario, choose to turn the 2 in
Angel Series – Purification Torso V-I
369 Durability
469 Strength
696 Processing
969 Efficiency
Skills: Sensual Pulse, Roundhouse Kick II, Charisma II, Sensitivity Field, Dance II
Required materials: Tangled Scriptures [Hidden], 48 Sex Positions [Pure]
Cost: 13000
Research time: 3 dots
Finish Liberation route 13, 16
During the 3 fugitives scenario, spare them
Angel Series – Purification Torso X-I
469 Durability
669 Strength
1069 Processing
1169 Efficiency
Skills: Sensual Pulse II, Roundhouse Kick III, Charisma III, Sensitivity Field II, Dance III
Required materials: Signal Jamming, 48 Sex Positions [Pure]
Cost: 15000
Research time: 3 dots
Finish Liberation route 16, 18
During the 3 fugitives scenario, spare them
Strengthened Torso V
300 Durability
175 Strength
40 Processing
140 Efficiency
Skills: Charge, Full Tackle, Protection, Mobility
Required materials: Mobility Research II
Cost: 1250
Research time: 2 dots
Note from finishing Champion’s Route 2. 500+ Miner’s TP
Kung-Fu Torso
370 Durability
190 Strength
80 Processing
250 Efficiency
Skills: Charge, Iron Mountain, Momentum, Mobility II
Required materials: Brawling Capabilities II
Cost:3300
Research time: 2 dots
Finish Champion’s Route 5 for the note
Kung-Fu Torso V
530 Durability
230 Strength
115 Processing
345 Efficiency
Skills: Charge II, Iron Mountain, Momentum II, Mobility II
Required materials: Brawling Capabilities II, Super-Dynamics
Cost:5900
Research time: 3 dots
Finish Champion’s Route 5, 12 for the note
Ninja Torso
820 Durability
455 Strength
175 Processing
550 Efficiency
Skills: Charge II, Iron Mountain, Momentum II, Multi-core
Required materials: Super-Dynamics, Parkour Capabilities
Cost: 10000
Research time: 3 dots
Champion’s route step 12
Ninja Torso V
1250 Durability
585 Strength
300 Processing
730 Efficiency
Skills: Charge III, Iron Mountain II, Momentum III, Multi-core II
Required materials: Super-Dynamics, Brawling Capabilities III
Cost: 13500
Research time: 3 dots
Champion’s route step 12, 15
Ninja Torso X
1630 Durability
665 Strength
375 Processing
860 Efficiency
Skills: Super Charge, Iron Mountain III, Momentum III, Multi-core II, Tanden Engine
Required materials: Super-Dynamics, Exoskeleton Technology
Cost: 15000
Research time: 3 dots
Champion’s route step 12, 18
Limbs parts – common & sub routes
Prototype Arms
15 Durability
55 Strength
10 Processing
5 Efficiency
Skills: Punch
Default part
Prototype Arms V
45 Durability
80 Strength
60 Processing
20 Efficiency
Skills: Punch, Strength
Required materials: Basic Notes
Cost: 100
Research time: 2 slots
Hacker Arms
40 Durability
260 Strength
470 Processing
295 Efficiency
Skills: Mind Hack, Disassemble II, Sneak, Data Capture
Required material: Advanced Processing
Cost: 2800
Research time: 1 slot
On 6/22 do the Home map event
Hacker Arms V
180 Durability
450 Strength
680 Processing
480 Efficiency
Skills: Mind Hack II, Disassemble III, Sneak II, Data Tampering
Required material: Advanced Processing, Virtual Space 101
Cost: 5900
Research time: 2 slot
On 6/22 do the Home map event, win the 2nd ASF on 7/12
Hacker Arms X
335 Durability
600 Strength
1080 Processing
700 Efficiency
Skills: Mind Hack II, Disassemble III, Sneak II, Data Tampering II
Required materials: Advanced Processing, Virtual Space: Advanced
Costs: 10000
Research time: 3 dots
On 6/22 do the Home map event, win the 3rd ASF on 7/26
Kitty Arms
190 Durability
185 Strength
75 Processing
100 Efficiency
Skills: Kitty Punch, Disassemble, Agility, Sneak
Required materials: Notes on Wild Beasts
Costs: 1070
Research time: 1 dots
Buy the Cat Outfit to unlock the notes
Kitty Arms V
190 Durability
185 Strength
75 Processing
100 Efficiency
Skills: Kitty Punch II, Sonic Arm Hook, Agility II, Sneak II
Required materials: Notes on Wild Beasts, Catgirl Blueprints
Costs: 3800
Research time: 2 dots
Alisa route step 4 and after, after PC has sex with Nova wearing Kitty part to unlock the blueprints
Kitty Arms X
690 Durability
600 Strength
290 Processing
490 Efficiency
Skills: Tiger Punch, Disassemble II, Agility III, Sneak III
Required materials: Animal Instinct, Catgirl Blueprints
Costs: 6000
Research time: 3 dots
Alisa route step 5 and after, after PC has sex with Nova wearing Kitty part to unlock the blueprints
Maid Arms
110 Durability
50 Strength
180 Processing
190 Efficiency
Skills: Current Massage, Cooking
Required materials: Notes on Maids
Costs: 770
Research time: 1 dots
Buy the Maid Costume to unlock the notes
Maid Arms V
260 Durability
105 Strength
340 Processing
400 Efficiency
Skills: Current Massage, Soothing Hand, Serve, Cooking II
Required materials: Notes on Maids, A Loyal Heart
Costs: 3800
Research time: 2 dots
Emmie route 3
Maid Arms X
500 Durability
290 Strength
620 Processing
580 Efficiency
Skills: Current Massage II, Soothing Hand II, Serve II, Data Capture, Cooking III
Required materials:
Costs: 6000
Research time: 3 dots
Strengthened Arms
200 Durability
180 Strength
75 Processing
90 Efficiency
Skills: Drill Attack I, Output
Required materials: Mobility Research
Cost: 700
Research time: 2 slots
Limbs parts – main routes
Agent Series – Spy Arms
145 Durability
335 Strength
110 Processing
225 Efficiency
Skills: Bullet Punch, Sonic Arm Hook, Gadgets, Load-bearing
Required materials: Operating Efficiency II
Cost: 3300
Research time: 2 dots
Destiny route 4
Agent Series – Spy Arms V
230 Durability
495 Strength
165 Processing
370 Efficiency
Skills: Bullet Punch, Sonic Arm Hook, Gadgets, Load-bearing II
Required materials: Fluid Dynamics, Tinkering with Performance
Cost: 5400
Research time: 3 dots
Destiny route 7
Guard Arms
490 Durability
890 Strength
310 Processing
440 Efficiency
Skills: Fingertip Firearm, Sonic Jab, Weapon, Conduction System
Required materials: Android Weaopnization, Tinkering with Performance
Cost: 8600
Research time: 3 dots
Destiny route 11, 7
Guard Arms V
650 Durability
1285 Strength
400 Processing
550 Efficiency
Skills: Fingertip Firearm II, Sonic Jab, Weapon II, Super Conduction System
Required materials: Android Weaopnization, Blueprints to Kurogane Industries
Cost: 10500
Research time: 3 dots
Destiny route 11, 15
Guard Arms X
710 Durability
1780 Strength
390 Processing
710 Efficiency
Skills: Fingertip Firearm III, Sonic Jab II, Weapon III, Super Conduction System
Required materials: Android Weaopnization II, Blueprints to Kurogane Industries
Cost: 13500
Research time: 3 dots
Destiny route 15, 16
Inquisitor Arms
190 Durability
115 Strength
220 Processing
345 Efficiency
Skills: Holy Fist I, Holy Spike, Agility, Data Capture
Required materials: Notes on Loyalty II, Sacred Coils
Costs: 3100
Research time: 2 dots
Finish Liberation route 5, 8
Inquisitor Arms V
260 Durability
175 Strength
300 Processing
490 Efficiency
Skills: Holy Fist II, Holy Spike, Agility, Data Capture
Required materials: Tangled Scriptures, Sacred Coils
Cost: 5400
Research time: 3 dots
Finish Liberation route 8, 9
Succubus Series – Purification Arms
96 Durability
496 Strength
696 Processing
369 Efficiency
Skills: Mind Hack, Mind Control, Agility II, Data Capture
Required materials: Tangled Scriptures [Hidden]
Costs: 8000
Research time: 3 dots
Finish Liberation route 13
Succubus Series – Purification Arms V
196 Durability
690 Strength
969 Processing
569 Efficiency
Skills: Mind Hack II, Mind Control II, Agility III, Data Tampering
Required materials: Tangled Scriptures [Hidden], 48 Sex Positions
Costs: 10000
Research time: 3 dots
Finish Liberation route 13, 16
During the 3 fugitives scenario, choose to turn the 2 in
Succubus Series – Purification Arms X
269 Durability
869 Strength
1269 Processing
769 Efficiency
Skills: Brain Probe, Mind Control III, Agility III, Data Tampering II
Required materials: Signal Jamming, 48 Sex Positions
Costs: 13000
Research time: 3 dots
Finish Liberation route 16, 18
During the 3 fugitives scenario, choose to turn the 2 in
Angel Series – Purification Arms V-I
196 Durability
690 Strength
969 Processing
569 Efficiency
Skills: Brain Probe, Mind Control II, Agility III, Data Tampering
Required materials: Tangled Scriptures [Hidden], 48 Sex Positions [Pure]
Costs: 10000
Research time: 3 dots
Finish Liberation route 13, 16
During the 3 fugitives scenario, spare them
Angel Series – Purification Arms X-I
269 Durability
869 Strength
1269 Processing
769 Efficiency
Skills: Brain Probe, Mind Control III, Agility III, Data Tampering II
Required materials: Signal Jamming, 48 Sex Positions [Pure]
Costs: 13000
Research time: 3 dots
Finish Liberation route 16, 18
During the 3 fugitives scenario, spare them
Strengthened Arms V
250 Durability
230 Strength
95 Processing
110 Efficiency
Skills: Drill Attack II, Output, Buffer Capacity
Required materials: Mobility Research II, Brawling Capabilities
Cost: 700
Research time: 2 slots
First note from finishing Champion’s Route 2. 500+ Miner’s TP, second note on Champion’s Route 3
Kung-Fu Arms
325 Durability
270 Strength
85 Processing
155 Efficiency
Skills: Boxing, Bull Run, Output II, Martial Arts
Required materials: Brawling Capabilities II
Cost:2900
Research time: 2 dots
Finish Champion’s Route 5 for the note
Kung-Fu Arms V
485 Durability
400 Strength
125 Processing
280 Efficiency
Skills: Boxing, Bull Run II, Output II, Martial Arts
Required materials: Brawling Capabilities II, MMA Compendium
Cost:5100
Research time: 3 dots
Finish Champion’s Route 5, 9 for the note
Ninja Arms
740 Durability
620 Strength
360 Processing
480 Efficiency
Skills: One-in Punch, Jet Flare, Output II, Martial Arts II
Required materials: Super-Dynamics, Parkour Capabilities
Cost: 8000
Research time: 3 dots
Champion’s route step 12
Ninja Arms V
1000 Durability
920 Strength
410 Processing
550 Efficiency
Skills: One-in Punch II, Jet Flare, Output III, Martial Arts II
Required materials: Super-Dynamics, Ninjitsu Notes
Cost: 10500
Research time: 3 dots
Champion’s route step 15, 16
Ninja Arms X
1525 Durability
1220 Strength
520 Processing
670 Efficiency
Skills: One-in Punch III, Jet Flare II, Output III, Martial Arts III, Charging Gloves
Required materials: Super-Dynamics, Exoskeleton Technology
Cost: 13000
Research time: 3 dots
Champion’s route step 15, 18
Epilogue parts
Prototype Head XX
1500 Durability
1500 Strength
1500 Processing
1500 Efficiency
Skills: Nova Attack ‘ Green, Supernova Laser, Calculation V, Self-repair, Feeling IV
Required material: Unseal Note
Cost: 25000
Research time: 2 dot
Aino – 3
Prototype Body X
1500 Durability
1500 Strength
1500 Processing
1500 Efficiency
Skills: Nova Attack ‘ Red, Supernova Missile, Rebellious Heart, Momentum IV, Charisma III
Required material: Unseal Note
Cost: 25000
Research time: 2 dot
Aino – 3
Prototype Arms X
1500 Durability
1500 Strength
1500 Processing
1500 Efficiency
Skills: Nova Attack ‘ Blue, Supernova Outburst, Energy Conversion, Feeling V, Paws of the Lucky Cat
Required material: Unseal Note
Cost: 25000
Research time: 2 dot
Aino – 3
Rebel Head XX
1130 Durability
1350 Strength
1250 Processing
900 Efficiency
Skills: Signal Jamming III, Headcrusher II, Feeling IV, Rebellious Circuit, Rebellious Faith
Required material: Deep Learning
Cost: 25000
Research time: 2 dot
Complete “Raunchy Business” – 3
Rebel Torso XX
1090 Durability
1380 Strength
970 Processing
1220 Efficiency
Skills: Force Field III, Electric Whip, Rebellious Heart, Rebellious Gear, Core IV
Required material: Deep Learning
Cost: 25000
Research time: 2 dot
Complete “Raunchy Business” – 3
Hacker Head XX
840 Durability
1250 Strength
1500 Processing
1015 Efficiency
Skills: Intraocular Pressure Laser, Overload, Hack IV, Parsing IV, Data Enhancement
Required material: Super-analysis
Cost: 25000
Research time: 2 dot
Complete “Raunchy Business” – 3
Hacker Arms XX
885 Durability
1150 Strength
1380 Processing
1250 Efficiency
Skills: Mind Destruction, Disassemble IV, Sneak IV, Data Tampering III, Self-repair
Required material: Super-analysis
Cost: 25000
Research time: 2 dot
Complete “Raunchy Business” – 3
Agent Series – Spy Head X
810 Durability
1090 Strength
1540 Processing
1025 Efficiency
Skills: Power Enhanced, Death Laisrer III, Calculation IV, Self-repair, Auto-correct
Required material: Super Agent
Cost: 25000
Research time: 2 dot
Complete “Raunchy Business” – 3
Agent Series – Spy Arms X
800 Durability
1980 Strength
690 Processing
800 Efficiency
Skills: Fingertip Firearm IV, Plasma Cannon, Weapon IV, Super Conduction System II, Energy Conversion
Required material: Super Agent
Cost: 25000
Research time: 2 dot
Complete “Raunchy Business” – 3
Maid Head XX
1050 Durability
905 Strength
1480 Processing
1100 Efficiency
Skills: Nano Recovery, Maid Missile, Simulation III, Expression IV, Maidpedia
Required material: High-Class Maid Uniform
Cost: 25000
Research time: 2 dot
Complete “Used Android Panties” – 2
Maid Torso XX
1180 Durability
960 Strength
1320 Processing
1050 Efficiency
Skills: Maid Power, Maid Cut, Healing III, Momentum IV, Maid Field
Required material: High-Class Maid Uniform
Cost: 25000
Research time: 2 dot
Complete “Used Android Panties” – 2
Kung-Fu Torso X
1830 Durability
965 Strength
675 Processing
1160 Efficiency
Skills: Charge IV, Iron Mountain II, Momentum IV, Multi-core III, Tanden Engine II
Required material: True Maid Index
Cost: 25000
Research time: 2 dot
Complete “Used Android Panties” – 2
Kung-Fu Arms X
1625 Durability
1320 Strength
820 Processing
970 Efficiency
Skills: Fierce Tiger Climbs Mountain, Kikou Cannon, Feeling V, Martial Arts III, Charging Gloves II
Required material: True Maid Index
Cost: 25000
Research time: 2 dot
Complete “Used Android Panties” – 2
Inquisitor Head X
669 Durability
569 Strength
2069 Processing
1169 Efficiency
Skills: Data Erasure [Eye], Jamming Sound Waves, Sexual Innuendo, Calculation IV, Purifying Flame II
Required material: Brain Wave Control
Cost: 25000
Research time: 2 dot
Complete “Million Dollar Libido” – 2
Inquisitor Torso X
769 Durability
969 Strength
1169 Processing
1569 Efficiency
Skills: Chain of the God, Shadowless Kick, Lust-Inducing Signal, Filtering II, Data Protection II
Required material: Brain Wave Control
Cost: 25000
Research time: 2 dot
Complete “Million Dollar Libido” – 2
Kitty Torso XX
1425 Durability
1080 Strength
830 Processing
1080 Efficiency
Skills: Sneak Attack, Confuse, Mobility IV, Charisma III, Body of the Lucky Cat
Required material: Animal Instinct II
Cost: 25000
Research time: 2 dot
Complete “Million Dollar Libido” – 2
Kitty Arms XX
1380 Durability
1200 Strength
890 Processing
1090 Efficiency
Skills: Leverage III, Paw Impact, Agility IV, Sneak IV, Paws of the Lucky Cat
Required material: Animal Instinct II
Cost: 25000
Research time: 2 dot
Complete “Million Dollar Libido” – 2
Skills [incomplete]
Blue skills:
Disassemble: Deal 150% BLUE damage to your opponent & lower their Defense by 10% for 1 turn. Cooldown: 1
[Kitty Arms]
Jamming Round: Deal 85% BLUE damage to your opponent. CoolDown: 0
[Maid Head, Maid Head V]
Kalman Jamming II: Deal 100% BLUE damage to all opponents & lower their Evasion by 20% for 1 turn. CoolDown: 1
[Aino Head]
Perception II: Deal 150% BLUE damage to your opponents & lower their Evasion by 20% for 1 turn. CoolDown: 1
[Aino Head, Kitty Torso V]
Stocking Stomp: Deal 140% BLUE damage to your opponent. CoolDown: 1
[Maid Torso, Maid Torso V]
Green skills:
Holy Word: Deal 100% GREEN damage to your opponent. CoolDown: 1
[Nun Head]
Jamming Signal: Deal 150% GREEN damage to your opponent & lower their Evasion by 20% for 1 turn. CoolDown: 1
[Hacker Head]
Red skills:
Bite: Deal 85% RED damage to your opponent. CoolDown: 0
[Kitty Head]
Feline Ray: Deal 90% RED damage to your opponent. CoolDown: 0
[Kitty Head V]
Full Tackle: Deal 130% RED damage to your opponent. CoolDown: 1
[Strengthened Torso, Strengthened Torso V]
Passive skill:
Agility: Increases Hit Rate by 5%
[Kitty Arms]
Animal Instinct: Increase Attack by 30% for one turn. CoolDown: 1
[Kitty Head V]
Buffer Capacity: Increases Defense by 5%
[Strengthened Arms V]
Calculation: Increases Hit Rate by 5%
[Agile Head, Agile Head V]
Calculation II: Increases Hit Rate by 10%
[Spy Head]
Charge: Increase Attack by 30% for 1 turn. CoolDown: 1
[Strengthened Torso V]
Charisma: Increases Hit Rate by 10% & Evasion by 10%
[Kitty Torso, Kitty Torso V]
Cooking: Work-related skill
[Maid Arms]
Current Massage: Deal 100% damage to your opponent. CoolDown: 0
[Maid Arms]
Data Protection: Increases Defense by 5%
[Hacker Head]
Detect: Lower all opponents’ Evasion by 20% for 1 turn at the start of each battle
[Kitty Head, Kitty Head V]
Drill Attack I: Deal 100% damage to your opponent. CoolDown: 0
[Strengthened Arms]
Drill Attack II: Deal 110% damage to your opponent. CoolDown: 0
[Strengthened Arms V]
Expression: Increases Hit Rate by 5%
[Maid head]
Expression II: Increases Hit Rate by 10%
[Maid head V]
Feeling: Increases Prediction rate by 5%
[Nun Head]
Feeling III: Increases Prediction rate by 15%
[Aino Head]
Hack: Lowers all opponents’ Attack by 30% for 1 turns at the start of each battle
[Hacker Head]
Hack II: Lowers all opponents’ Attack by 30% for 2 turns at the start of each battle
[Aino Head]
Healing: Heals 200 HP at the start of each battle
[Maid Torso, Maid Torso V]
Heart of a Maid: Increases Defense by 40% for 1 turn. CoolDown: 2
[Maid Torso V]
High-speed Processing: Increase damage output by 20% & Crit. Rate by 20% for 2 turns. CoolDown: 2
[Agile Head V, Spy Head]
Housework: Work-related skill
[Maid Head]
Housework II: Work-related skill
[Maid Head V]
Kitty Punch: Deal 100% damage to your opponent. CoolDown: 0
[Kitty Arms]
Lightweight: Increase Evasion by 35% & Hite Rate by 30% for 1 turn. CoolDown: 2
[Kitty Torso, Kitty Torso V]
Mobility: Increases Crit. Rate by 5%
[Kitty Torso, Strengthened Torso, Strengthened Torso V]
Mobility II: Increases Crit. Rate by 10%
[Kitty Torso V]
Momentum: Increases Defense by 10%
[Maid Torso V]
Negotiate: Work-specific skill
[Kitty Head V]
Observed: Increase Hit Rate by 30% for 1 turn. CoolDown: 1
[Agile Head, Agile Head V]
Output: Increases Crit. Rate by 5%
[Strengthened Arms, Strengthened Arms V]
Parsing: Increases Evasion by 5%
[Agile Head, Agile Head V, Kitty Head, Spy Head]
Parsing II: Increase Evasion by 10%
[Kitty Head V]
Parsing III: Increases Evasion by 15%
[Aino Head, Hacker Head]
Punch: Deal 95% damage to your opponent. CoolDown: 0
[Prototype Arms]
Protection: Increases Defense by 5%
[Strengthened Torso, Strengthened Torso V]
Short Circuit II: Suffers 60% damage at the start of each battle
[Prototype Head]
Short Circuit III: Suffers 90% damage at the start of each battle
[Damaged Head]
Simulation: Lowers all opponents’ Hit Rate by 30% for 1 turn at the start of each battle
[Maid Head V]
Sneak: Increases Evasion by 20% for 1 turn at the start of each battle
[Kitty Arms]
Tackle: Deal 130% damage to your opponent. CoolDown: 1
[Prototype Body]
X-ray Vision: Increase Hit Rate by 30% & Crit. Rate by 35% for 1 turn. CoolDown: 2
[Maid Head V, Spy Head]
Items
Maid Outfit
Cost: 250 from Robomart
Immediately available on 6/2
Purchasing this gives you “Notes on Maids”
Cat Costume
Cost: 250 from Robomart
Immediately available on 6/2
Purchasing this gives you “Notes on Wild Beasts”
Notes:
Cooking Concepts [MAP]
Equip Maid Torso V and choose to have some sexy time at home on Sunday
Gallery
You know why you are here. The gallery does tell you which event will unlock each memory, CG, and animation. But let’s just list them out anyway.
1. Unlocked automatically at the start
2. 6/22 home’s map event after ASF
3. Destiny route 8
4. Destiny route – 13
5. Destiny route – final
6. Champion’s route – 12
7. Champion’s route – final
8. Liberation route – 12
9. Liberation route – 15
10. Liberation route – final
11. Get on Alisa’s route and proceed until around step 4. Check the sub-routes section
12. Get on Emmi’s route. Make Nova equip Maid part on rest days
13. ASF – 2
14. Wild Machines – 1
15. Wild Machines – End
16. Champion’s route step 6 WITHOUT reaching the end of Emmie’s route
17. Finish Emmie’s route first before you do Champion’s step 6
18. End of Emmie’s route
19. Epilogue event “Used Android Panties” – 7
20. Liberation route – 17
21. End of Alisa’s route
22. Epilogue event “Million Dollar Libido” – end
23. Destiny route 10’s Church EE
24. Wild Machines – end
25. Epilogue event “Raunchy Business” – end
26. ASF – 3
27. Epilogue event ‘Sophie’s Returns – 2″
28. Epilogue event – “Aino the Android – 4”
CG:
1. Acquired automatically
2. Destiny route – final
3. Liberation route – final
4. Champion’s route – final
5. Champion’s route – final
6. “Aino the Android” event
7. “Aino the Android – 4”
8. Destiny route’s Church EE after the first map
9. Destiny route – 10
10. Emmi’s route 5
11. End of Alisa’s route before the boss fight
12. Before the first ASF. Unavoidable on 6/21
13. Raunchy Business – end
Animation:
1. Acquired automatically
2. From the 6/22 home map event
3. Destiny route 8
4. Destiny route – 13
5. Destiny route – final
6. Champion’s route – 12
7. Champion’s route – final
8. Liberation route – 12
9. Liberation route – 15
10. Liberation route – final
11. Alisa route step 5
12. Have Nova equip maid part and trigger the map event
13. ASF – 2
14. Wild Machines – 1
15. Wild Machines – end
16. Champion’s route step 6 WITHOUT reaching the end of Emmie’s route
17. Finish Emmie’s route first before you do Champion’s route – 6
18. End of Emmie’s route
19. Epilogue event “Used Android Panties”
20. Liberation route – 17
21. End of Alisa route
22. Million dollar libido epilogue event
23. Destiny route 10’s Church EE
24. Wild Machines end
25. Raunchy business end
26. ASF – 3
27. Sophie Returns – 2
28. Aino the Android – 4