Seeds of Chaos – Simple Game guide.
AVOID GAME OVER
Alright, can we sticky this info somewhere? It doesnt have to be my post, just anything that gives some easy to follow instructions on how to avoid game overs.
The two real game overs in this game are at Weeks 22 and 60.
Week 22:
To avoid the game over, you must capture Raeve Keep before this point, and have 500 or more gold crowns in the treasury—this is the important bit. Any gold Rowan has in his own inventory doesn’t count (you can put Rowan’s gold in the treasury from his personal room menu).
Capturing Raeve Keep
SPOILER
Raeve Keep is the castle located across the bridge just East of the starting portal. To capture it, you must have 150+ military power, or have constructed the Brothel and recruited a spy. After recruiting the spy, visit Raeve Keep and choose the Infiltrate option. I believe the spy path takes a few weeks after the initial infiltration, so leave yourself a little padding with that option.
How to Infiltrate:
Step One: Research Opulence at the library. This makes the research subject Dark Subterfuge available.
Step Two: Research Dark Subterfuge at the library. This opens the Brothel for construction at the workshop.
Step Three: Construct the Brothel at the workshop. A week later, the brothel will be in the upper right corner of the basement.
Step Four: Visit the brothel and recruit a spy. You can recruit one spy per week from the menu there.
Step Five: Visit Raeve keep. (You may need to do this twice to get to the right menu if it’s your first time there.) Choose the Infiltrate option from the list of choices; in the current build, I don’t think any of the spies’ traits matter, so pick any you have access to.
Deal with the Orc camp
Week 60:
Note: All of the following instructions should only be followed AFTER Week 22. Before then, some places simply won’t be accessible, and trying to visit others before you’re supposed to in the current public version may actually break the game.
To avoid the game over, you must find and recruit an unaffiliated army. The only one available in the current version is the orc army. You must also visit Rastedel.
Finding the orc army
From the starting portal, follow the road North. Keep going North at the next fork you encounter (there should be a bridge and an abbey directly north of the fork). There will be a second fork just North of the abbey; follow the road that goes Northwest. You’ll find an orc camp very close to the second fork; this is the army camp.
From the northern portal, step North onto the road, and follow the road West. You’ll reach a fork (this is the same as the second fork in the instructions above). Follow the road that leads Northwest, and you’ll quickly see the orc camp. This is the army camp.
Finding Rastedel
From the starting portal, follow the same instructions as finding the orc army above until you reach the second fork. Instead of heading Northwest, follow the road East. Continue following the road (it’ll be a while), and you’ll reach a large city. This is Rastedel.
From the northern portal, step north onto the road, and follow the road East. Continue following the road (it’ll be a while), and you’ll reach a large city. This is Rastedel.
Recruiting the orc army
This is a complex, multiweek process, and there are four paths to success. In your first visit to the orc army camp, you’ll hear of three figures vying for power; an old orc chief (Ulcro), a young warrior (Batri), and a scheming woman (Tarish). You’ll either have to support one of the three in their bid for power, or ignore them and focus on rescuing the noblewoman prisoner, which causes the conflict to sort itself out. Before going into any path, find the noblewoman, since doing so is necessary for all four routes.
Finding the noblewoman
You must locate the noblewoman prisoner (Delane). To do this, pick the “explore the camp” option until you find the building where she’s been hidden. Don’t worry if this takes more than one week. Once you’ve found her, you’ll need to continue exploring the camp until you encounter her again, at which point you’ll actually speak to her. This unlocks the camp menu option “Sneak in to meet with noblewoman”; you can do this once a week.
To support Ulcro
After visiting Ulcro, the camp menu option “Hunt for gifts for Delane” becomes available. Use this option several times until you have enough gifts for her. You must also visit the noblewoman once a week, and use the “Convince her to Accept Ulcro” options. After you’ve done both requirements enough times, she’ll consent to be Ulcro’s woman, and Ulcro will reestablish his authority. Success!
To support Batri
Note: For this path, you’ll need to have constructed the Brothel and recruited a spy. For instructions on how to do this, see the “How to Infiltrate” instructions under Week 22 above.
After visiting Batri and finding the noblewoman (and assuming you have an available spy), the camp menu option “Corrupt Delane” becomes available. Select it; in the current build, I don’t think the spies’ traits matter, so pick any you have access to. This process takes a few weeks (you’ll receive reports from your spy between weeks). While you’re waiting, use the “explore the camp” menu option until you encounter a group of orc raiders. It gives you the choice to tag along with them; do so. This unlocks the camp menu option “Go on a raid.” Use this option a few times; this raises morale among the younger orcs that support Batri. When your spy reports that Delane is ready, visit the camp again to watch Batri take over. Success!
To support Tarish
After visiting Tarish, meet with the noblewoman once a week. You need to use the “Gain her trust” option until you’ve exhausted all the topics of conversation. Also after visiting Tarish, when you return to Bloodmeen castle after the week is over, visit Cla-Min’s caravan and the throne room. Doing so gives you the items you need to execute Tarish’s plan. Once you’ve gained Delane’s trust, you’ll be able to help her escape. Choose to stick to the plan when the option comes up, and she’ll be recaptured by Tarish’s followers, leading to Tarish taking over. Success!
To rescue Delane
After speaking to the noblewoman for the first time, go back to visit her once a week, choosing the “Gain her trust” option each time until you’ve exhausted the topics of conversation. Once you’ve gained her trust, you’ll be able to help her escape. Once this is accomplished, you’ll no longer be able to do anything at the army camp, so make sure you’ve done everything there you wanted to do; otherwise, events will take their course and Tarish will end up leading the orc army under the twins’ banner. Success!
EARLY GAME GUIDE
I was sort of working on a week by week breakdown of how I try to optimize the first few weeks of exploration so I’d remember for future playthroughs, though I trailed off on that and it’s been a while since I’ve actually restarted the game, so I haven’t gotten back to it yet. Here’s a loose breakdown that assumes you’re okay with savescumming.
Disclaimer: I’m mostly working off memory and briefly poking around some of my save files here, so there are probably some mistakes. Anyone reading this, please feel free to inform me if you find any, or have any alternate ideas on some of the opinions I’ve presented here. Thanks! Also sorry this got quite a bit wordier than I intended.
Things to do while exploring
[Villages] To secure a stream of revenue, you’ll want to capture as many villages as you can as early as possible. Unfortunately, since you won’t have that many orcs early on, you won’t be able to make many gains in the first few weeks. You’ll want to savescum for the corrupt nobleman (the one that starts with a nobleman trying to whore out village girls to you for favors) event early on, as this allows you to capture a village without wasting soldiers. After you’ve captured three or four, switch to making trade agreements—these increase your weekly revenue more than captures, though you’ll want some captures under your belt to help trigger events.
* * * IMPORTANT * * * As of the last version I tried (0.2.43), a bug prevented most unique village capture events from registering successful captures/trade agreements. Only the corrupt nobleman event and the old ways event (the one that starts with Rowan stumbling on some villagers about to make a human sacrifice) seem to register as successful. The generic village capture/trade events (those that start with a choice on whether to capture the village, trade with it, etc.) will all register successfully. I recommend savescumming for these successful events each time you enter a village.
[Abbeys] To increase your research rate, you’ll want to capture as many abbeys as you can as early as possible. Thankfully, unlike villages, abbeys don’t deplete your military force, so the only thing preventing you from taking them all right away is distance. At this point in time, there’s little benefit to increasing your total weekly research over 20, as any research points over the total needed for a topic are wasted, so keep that in mind when deciding whether to make the trip to farflung abbeys.
* * * IMPORTANT * * * There are a couple of abbey events that don’t result in research bonuses. (Unlike villages, the narrative of those events leads me to believe this is intentional and not a bug.) I unfortunately can’t remember how these events begin, so make a save before entering an abbey, make another save after finishing it, and then end exploration early to check in the castle whether your research bonus has increased. (You can find this figure at the very bottom of the list of statistics you get when you click the scroll icon in the upper right corner of the castle screen.) If your research rate has increased, reload from your save after the abbey; if it hasn’t, reload from the save before the abbey and try for a different event.
[Mines] To increase your military strength, you’ll want to capture a couple of mines early on. You only really need about 10 iron/week max, and you can’t even benefit from more than 5 until you get the Forge Lvl2 (a fairly low priority), so don’t worry about getting too much too early. Mines are also less vital early on than villages, so focus on those first three village captures before sending your soldiers to become miners, nor is it worth the gold you need to hire workers. (The first mine you take is a freebie, though, and Jezera has that one staffed out of her own pocket, so grab the first one you see ASAP.) There’s only one unique mine capture event that doesn’t result in a successful increase in iron production rate, and this is definitely intentional based on the narrative (it starts with Rowan finding a message written in the goblin language). You can savescum around this if you like. Later on, after you’ve made your 3-4 village captures and have captured Raeve keep, feel free to capture as many mines as you like, as you’ll be getting new orcs faster than you can use them up at that point.
[Drider Eggs] You only really need to successfully capture one of these locations, and you can only do so after you build the breeding pit, so this is super low priority.
Things to do in the castle
[Week 4] Week 4 is the first time you’ll have access to the castle, and starts you on an administrative choice right off the bat: whether to start construction on a building project (forge, tavern, or dark sanctum), or buy something from Cla-Min. You’ll want to start construction. My recommendation is the dark sanctum—this lets you start recruiting cubi sorcerers, which add to your overall military might directly (though I don’t recommend using them in village captures, they’re too valuable to waste), as well as indirectly (they give your orcs a multiplier to their military strength in the same way iron equipment does). They also increase your research rate by 0.5 per recruited cubi, which is critical for increasing research early, and you’ll need the dark sanctum to unlock the futa events, if you’re into that.
[Construction] You’ll want to start other building projects as your funds allow—keep in mind that you need 500 gold in the castle coffers by Week 22, though, so don’t overextend your finances. After the Dark Sanctum, I recommend the following projects in the following order:
* * [Forge] Assuming you have access to a steady stream of iron, the forge increases your military might (in the form of a multiplier for your orcs) by equipping your soldiers with better equipment. Several Forge related events are also locked behind low corruption, so it’s best to get them out of the way early if you’re interested.
* * [Tavern] Aside from being required for several events (including one of those low-corruption gated forge-related events), the tavern also increases your weekly revenue.
* * [Brothel] * * NOTE * * Only build the brothel at this point if you plan to infiltrate Raeve Keep. The brothel is necessary for recruiting spies; you’ll want this early if you plan to infiltrate the keep because the infiltration requires a few weeks to complete. Try to have it complete by week 16 if you have the funds, and don’t forget to visit the brothel after its completion so that you can manually recruit at least one spy.
* * [Library Lvl2] This doesn’t do much for us by itself, but it’s necessary to unlock the option to build the Dark Sanctum Lvl2, which we absolutely do want as early as possible.
* * [Dark Sanctum Lvl2] This lets you upgrade the number of cubi you can have at once from 5 to 10, which will ultimately double their contributions to your orcs’ military strength and your research rate. If you can afford it before Week 22, that’s great, but you’ll most likely have to wait till after that point.
* * [Breeding Pits] Lets you recruit driders to increase your military strength, but that should be pretty superfluous by the time you get around to building this. You’re mostly building this for the events.
* * [Arena] This theoretically helps keep soldier morale up, but honestly there’s not much danger of morale falling off significantly. You’re mostly building this for the associated events.
* * [Brothel] If you didn’t build this earlier, I recommend building it now. If you’ve followed the rest of the guide, you should have enough money to get this built before Week 50, and you’ll need it if you want to support Batri’s bid for leadership when you recruit the orc army (Week 60 is the deadline), and even if you don’t, it unlocks a few events. Remember to actually visit the brothel after it opens, you have to manually recruit spies.
* * [Anything Else] As of the last version I got very far in the game (0.2.42), assuming my memory isn’t failing me, nothing else is particularly useful—though there were a few I never built, like the Warg Kennel and Living Quarters Lvl2. As of the current version of the game (0.2.44), Orc Barracks Lvl2 and above are a trap—you won’t need more military might than a single barracks of fully equipped orcs and 10 cubi sorcerers will give you, and aside from the cost of building the barracks, more orcs also increase the weekly maintenance expenditures.
[Research] There’s no especially fixed order to do these in, though some are definitely much higher priority than others. It’s worth noting that while the time to research is measured in “moves,” the number of turns you have to explore each week don’t really matter—research rate (called “Tech Rate” in the menu of statistics that pops up when you click the scroll icon in the upper right corner of the castle screen) is the stat that matters, and you should keep an eye on it to help decide which projects to prioritize. Major landmarks are 10/week (where you start), 13.5/week (enough to finish 40 move projects in 3 weeks), 15/week (enough to finish 60 move projects in 4 weeks), 17/week (enough to finish 50 move projects in 3 weeks), and 20/week (enough to finish 40 move projects in 2 weeks and 60 move projects in 3). Any higher than that is gravy, but unnecessary in the long run. Here’s a list of significant projects by rough priority, though you can switch most of the first several up as makes sense to you:
* * [Survivalism and Cartography] (40 moves) This is the exception to switching things up—it’s the first one you should take, hands down. It gets you an extra two turns when exploring the map, which doesn’t sound like much, but it’s an extra 20%. That’ll let you get to and capture villages, abbeys, and mines that much faster.
* * [Opulence] (40 moves) We don’t care about this in and of itself, but it opens up the Dark Subterfuge project, which we need for recruiting spies.
* * [Dark Subterfuge] (60 moves) This unlocks the Brothel for building in the workshop. Important if you plan on infiltrating Raeve Keep or supporting Batri when recruiting the orc army; get this done ASAP if you plan on infiltrating Raeve Keep, as it’s a significant time investment getting both research projects done, and you don’t have much time to work with.
* * [Contact Network] (40 moves) This unlocks the Library Lvl2 upgrade for building in the workshop, which in turn unlocks the Dark Sanctum Lvl2 upgrade for building. This is great for increasing research and military strength early, but also time- and funds-intensive, so if you plan on infiltrating Raeve Keep, definitely focus on getting Opulence and Dark Subterfuge done first.
* * [Monster Taming] (60 moves) This unlocks the Breeding Pits for building in the workshop. Mostly important to unlock events related to the space and its NPCs.
* * [World and the War] (40 moves) I think this unlocks some slight variations on events when you first get to Rastedel, so it may be of interest, though I don’t think it’s anything of great importance in the current version of the game.
* * [Rosarian History] (50 moves) Unlocked by researching World and the War. I think this might also unlock more variations on events when you first get to Rastedel, with the same caveats of importance.
* * [Surveying and Telescopics] (40 moves) Mostly of interest if you don’t have access to a map (you can find one from the title menu in dev mode, but there doesn’t seem to be one easily available on google) and/or don’t have a pretty good sense of where things are. It extends your visual radius by one tile while exploring, letting you find villages, abbeys, mines, etc. more easily.
* * [Anything Else] (varies) By the point in the game that you’ve finished researching most of the projects above, nothing else will have any great level of impact, and there are some options that don’t seem to have any effect at all. Worth mentioning here is Advanced Survival Techniques, which unlocks after you finish researching Survivalism and Cartography. The name and parentage would seem to indicate it does something similar to S&C, but the last time I researched it (in version 0.2.39), it didn’t have any noticeable effect, and didn’t increase my turns per week.
[Events] Most “ruler events” (events that randomly take place after the end of each week exploring) that you might want to savescum for depend on what sex scenes you’re looking to view, and that can more or less be pieced together from the google drive guide linked in the opening post of the thread. There are a few you might consider savescumming for early on to give yourself a headstart on funding building projects, though, as well as a couple you might want to avoid. Your best bet for savescumming these events with minimal frustration is to save on the black screen that appears when you’ve finished exploring that says “End of Week X.” The event that plays for that week is rolled immediately after that screen. Unfortunately, this holds true even when a scripted event (for instance, when you finish a building project and are introduced to the relevant NPCs) plays after that screen but before the randomly rolled ruler event, so weeks with scripted events are a bit more annoying to savescum.
[Events To Look For] All of these become available by 15 weeks in (probably much earlier, but I can confirm the 15 figure), and I don’t think they rely on any other events being completed (not even each other).
* Cla-Min will come to you in the throne room to apologize about counterfeit coins, and however you handle it, you’ll wind up 100 gold richer.
* An orc will report to you in the throne room that an unexpected large sum of loot was captured. Choose to put it in the castle coffers, and you’ll get another 100 gold.
* You’ll find Cliohna and Skordred fighting in the library. Side with Skordred, and you’ll get a third pile of 100 gold.
[Events To Avoid] These events are also available early on, and don’t seem to rely on any other events.
* Jezera will approach you telling you she’s taking funds from the castle for a project of her own. There doesn’t seem to be any upside to this, and it removes 50 gold from the coffers.
* Skordred will approach you in the throne room and talk with Rowan about castle damages. This also doesn’t seem to include any upsides, and also removes 50 gold from your funds.
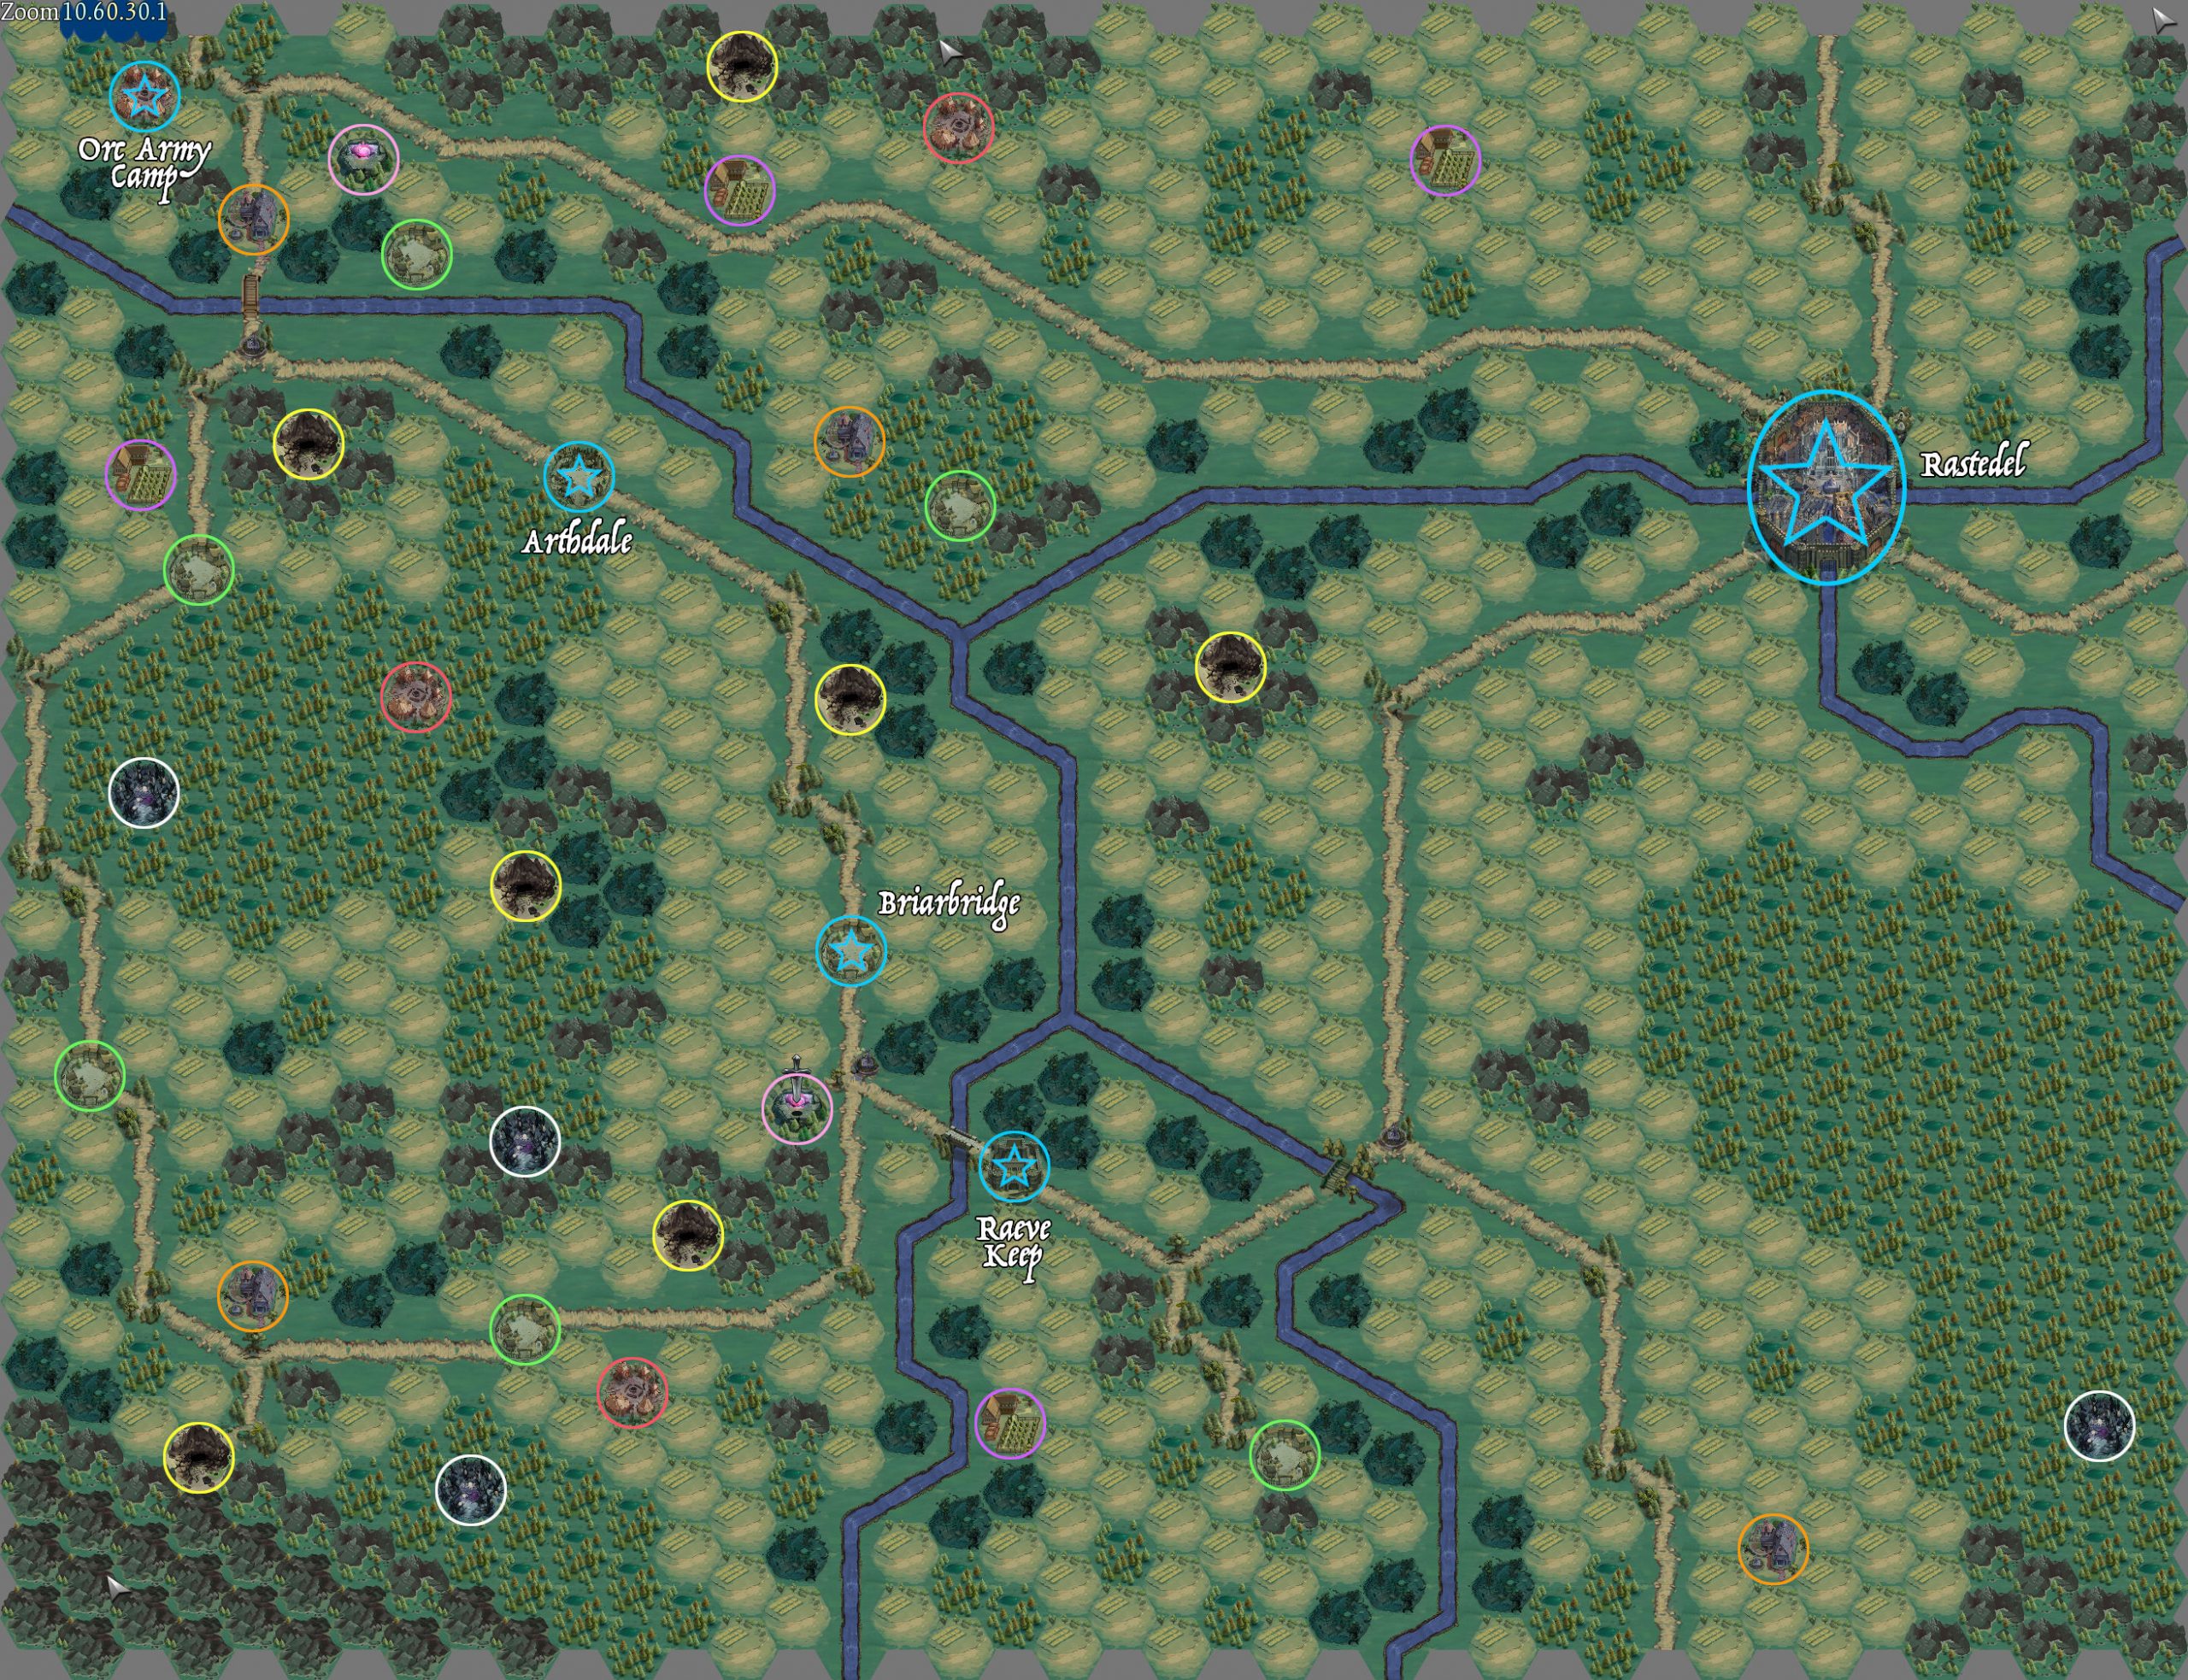
Courtesy of Stes, now with Map! See this post for a map key.
Stes said:
Andras got the short end of the stick.
That sort of depends on how you look at it. True, Andras’s scenes with Alexia are shallower, but that reflects his interest in the affair—he’s only really interested in her to sate his lust and to demonstrate his power over her and Rowan, it doesn’t really go any deeper than that. Jezera’s interest in Alexia is more complex, and so the scenes she has with her are more involved (which is what makes them, imo, more interesting).
That said, even with the recent Jezera update, Andras has more scenes with Alexia (though granted, not much in the way of penetrative sex). JezeraxAlexia has, I believe, 4 scenes, while AndrasxAlexia has 6, 7 if you include the tavern harassment scene. That doesn’t seem like a huge difference, but it’s 50% more scenes. 50% more updates devoted to the one pairing than the other, though I won’t make any presumptions about how much time the scenes take to write.
Seeds of Chaos Rosary map